
In my view, the ls command is the most used Linux command as it’s typically used to confirm the result of the earlier operation by itemizing the listing contents.
The ls command stands for an inventory; all it does is listing the contents of the desired listing.
On this tutorial, I will stroll you thru a number of examples of utilizing the ls command.
I may even share some observe questions to check the learnings.
Find out how to use the ls command
To make use of the ls command, you’d should observe the straightforward command syntax:
ls [OPTIONS] Targeted_DirectoryRight here,
[OPTIONS]: It’s used to tweak the default conduct of the ls command.Targeted_Directory: That is the place you present the listing title or absolutely the path to the listing.
You may marvel what occurs once you use the ls command with none choices. And to reply that, I used the ls command in my present working listing:
ls 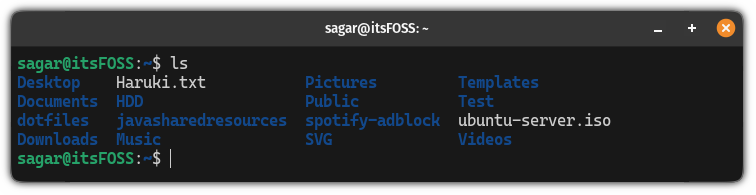
As you may see, it listed all of the directories and information accessible within the present working listing. However you are able to do much more than simply getting the names and information current within the present working listing.
Let me present you the way.
1. Record information and directories with possession
One of many major use of the ls command to search out the permissions and possession of a selected file or a listing.
For that you simply’d have to make use of the -l possibility (additionally known as lengthy itemizing) with the ls command:
ls -lWhen you try this, you may count on related output:
[email protected]:~$ ls -lh
-rwxrw-r-- 1 sagar sagar 666M Dec 10 18:16 Fedora.iso
Discover how I used an addition -h possibility? I will talk about it within the subsequent part.
For now, if the output seems too sophisticated, then let me simplify issues for you:
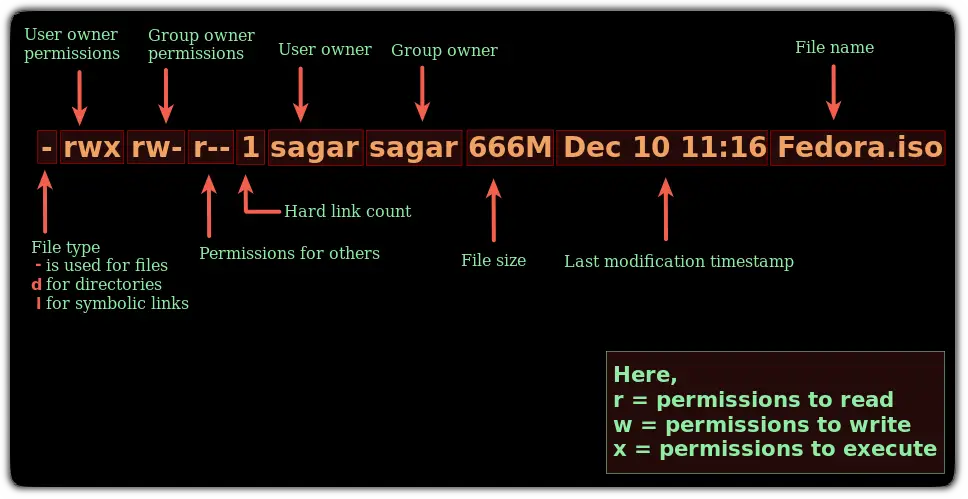
As you may see, every textual content block has its personal that means such because the permissions for proprietor, group, and others.
If you wish to dive deep into file permissions, I’d advocate our detailed information on file permissions in Linux:
Linux File Permissions and Possession Defined with Examples
Linux file permissions defined in less complicated phrases. Additionally learn to change the file permissions and possession in Linux on this detailed newbie’s information.

2. Get info in a human-readable format
By default, the file dimension is proven in bytes which isn’t one of the simplest ways to know your file dimension. So how do you get the identical information however in human-readable kind?
Easy. You utilize the -h possibility with the ls command:
ls -l -hAnd this is the comparability between the default and the human-readable kind:

Significantly better. Is not it?
💡
The ls command is nice to see the file sizes. Nevertheless, it will not provide the listing dimension which is nearly at all times displayed as 4K. To get listing dimension, use the du command.
3. Record hidden information
Like another file supervisor, the ls command will not listing the hidden information (I imply they’re alleged to be hidden. Proper?).
However what if you wish to listing the hidden information together with the common information? To take action, you need to use the -a possibility:
ls -aAs you may see, the filename beginning with a dot . are hidden information.

💡
You may additionally use ls -A which works nearly the identical as ls -a besides it will not embody the . and .. directories.
4. Record information recursively
There are a number of methods to listing information recursively and utilizing the ls command is certainly one of them.
In case you do not know, itemizing information recursively means itemizing information of all of the sub-directories current till the final aspect of each sub-directory is proven.
And to listing information recursively, you need to use the -R flag as proven:
ls -R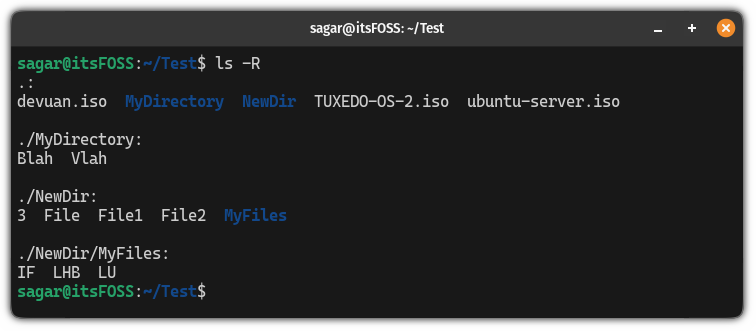
In a manner, it provides you the present listing construction. Personally, I favor the for this goal however you will have to put in it first.
💡
You do not have to be within the listing to listing its content material. It’s also possible to listing listing contents by offering its absolute or relative path like this: ls /var/log
5. Differentiate between information and directories whereas utilizing ls
Whereas the completely different colours for information and directories ought to do the job. However attributable to some cause, if you wish to symbolize information and directories right here you’ve got it.
Within the ls command, you’ve got a -F flag that provides a ahead slash / to each listing title:
ls -F
6. Record solely information with sure file extensions
There are occasions once you solely need to listing information with particular file extensions and belief me that is the best of all.
To try this, you do not have to make use of any choices. Simply append the file extension to the Asterisk * reminiscent of *.png, *.txt, and so forth:
ls *.extensionFor instance, if I solely need to listing the ISO information, then, I might be utilizing the next command:
ls *.iso
7. Kind output primarily based on dimension
To kind the output primarily based on the file dimension, you’d have to make use of the -S flag and it’ll listing information from largest to the smallest method (descending):
ls -lhS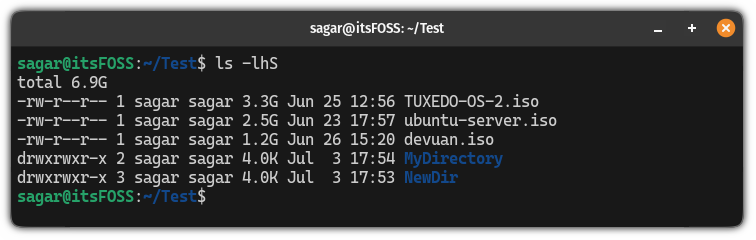
Equally, if you wish to reverse this order to listing the smallest information first, you need to use the -r flag to reverse the order:
ls -lhSr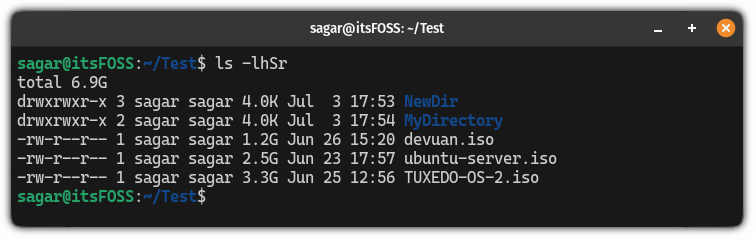
8. Kind information primarily based on date and time
The ls instructions contains the modified time in its itemizing.
To listing the latest information first, you need to use the -t flag as proven:
ls -lht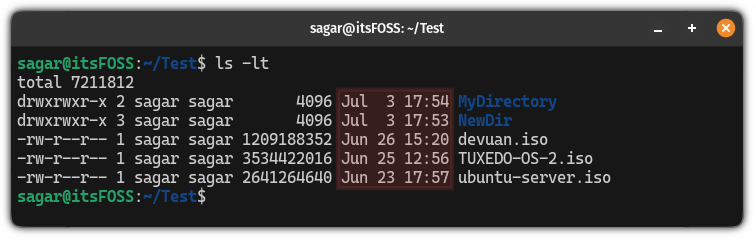
You need to use the -r flag as I defined beforehand to reverse the order right here too.
ls -lrtThis offers you the newest modified information on the backside of the show. That is significantly useful you probably have too many information within the listing and need to see which information had been modified lately. I used this whereas troubleshooting my software program mission.

Let’s summarize what you’ve got discovered to this point!
Right here, I’ll share a desk with a number of choices that had been used with the ls command on this tutorial:
| Command | Description |
|---|---|
ls -l |
Lengthy listing of information and directories |
ls -lh |
Prints info in human-readable kind |
ls -a |
Embrace hidden information in itemizing |
ls -R |
Record information recursively |
ls -F |
Add a ahead slash to the listing title |
ls *.ext |
Record information having particular extensions |
ls -lS |
Kind information primarily based on file dimension |
ls -lt |
Kind information primarily based on time |
-r |
Reverse the sorting (mixed with S or t) |
🏋️And observe your studying
Training what you’ve got discovered is at all times a good suggestion, which is why we attempt to add a observe part in every terminal information.
So listed here are some easy observe train of the ls command:
- Record the contents of the
/var/log - Save the command output in a file named output.txt
- Determine the three most up-to-date information (Use time primarily based sorting)
- Show the information primarily based on their dimension however in reverse order
- Examine if there are any hidden information
That may be good observe for you. Keep tuned for extra Linux command studying.
And if you’re new to the terminal, remember to observe our Terminal Fundamentals sequence
Linux Command Tutorials for Absolute Novices
By no means used Linux instructions earlier than? No worries. This tutorial sequence is for absolute inexperienced persons to the Linux terminal.

Take pleasure in 🙂