Python is a flexible programming language, significantly within the subject of graphical person interface (GUI) improvement. Among the many quite a few GUI frameworks out there, tkinter stands out as a preferred alternative resulting from its simplicity and ease of use. One of many basic facets of tkinter is its versatile grid system, which permits builders to create dynamic and responsive person interfaces effortlessly.
This text explores the intricacies of the tkinter grid, its syntax, functionalities, and finest practices in constructing intuitive person interfaces.
What’s the tkinter Grid?
The “tkinter grid” is a robust instrument that provides a versatile format administration system. At its core, the tkinter grid is a two-dimensional desk with rows and columns, the place every cell can maintain a widget comparable to buttons, labels, or entry fields. The grid permits builders to specify the placement of every widget by row and column indexes.
It permits builders to rearrange GUI components, comparable to buttons, labels, and entry fields, into rows and columns. This association brings a few structured and arranged format, making person interfaces visually extra interesting and user-friendly.
Syntax
widget.grid(grid_options)
On this syntax, the “grid_options” will be the next:
column: The column to put the widget; the default worth is 0 (the leftmost column).
columnspan: By default, a widget occupies one column.
ipadx, ipady: These seek advice from the pixels padding the widget’s boundaries each horizontally and vertically.
padx, pady: These correspond to the pixels padded outdoors of the borders of v, in each the horizontal and vertical instructions.
row: The primary row that’s nonetheless vacant by default is the row the place the widget must be positioned.
rowspan: It factors to the variety of areas a rowswidget takes up; the default worth is 1.
sticky: What to do if the cell is larger than the widget, sticky. With sticky=”, the widget is centered in its cell by default. Sticky is a string made up of zero or extra of the compass instructions N, E, S, W, NE, NW, SE, and SW, which point out the perimeters and corners of the cell to which the widget adheres.
Fundamental Grid Configuration
To successfully make the most of the tkinter grid, builders should perceive the fundamental configuration parameters. Organising the rows and columns, adjusting their sizes, and defining the relative positioning are key elements.
As soon as the grid construction is established, builders can deal with managing particular person grid cells. Properties comparable to padding, margins, spacing, and spanning enable refinement of the person interface. By specifying these traits for every grid cell, a fascinating degree of management is achieved, making certain that GUI components align optimally inside the general grid format.
With the grid construction in place, tkinter gives exact management over widget placement and positioning. The grid supervisor allocates every widget to a particular cell, permitting builders to manage its location. Moreover, by specifying the row and column for every widget, together with any desired span, builders keep utmost management over the ultimate format of their person interface.
Making a Tkinter Grid
The next code creates a primary Tkinter grid:
import tkinter
root = tkinter.Tk()
for r in vary(3):
for c in vary(3):
tkinter.Label(root, textual content=‘Rpercents/Cpercents’%(r,c), borderwidth=1 ).grid(row=r,column=c)
root.mainloop()
On this code snippet:
-
- The first utility window is first created by importing the “tkinter” module and utilizing “tkinter.Tk()”.
- The grid’s rows and columns are then iterated utilizing stacked “for” loops. There’s a tkinter for every grid cell. The label widget has the textual content “Row_number/Column_number” in it.
- To present every label a border, the “borderwidth” possibility is about to 1. Every label within the grid is positioned by utilizing the “grid()” methodology.
- With “root.mainloop()”, the appliance’s essential occasion loop is launched after configuring all the grid, enabling the GUI to react to person interactions.
Output

Dynamic Grid Changes
The tkinter grid turns into invaluable with regards to constructing responsive person interfaces. It permits builders to dynamically modify the grid format based mostly on altering window sizes or necessities. By adopting the grid’s flexibility, builders can create GUIs that adapt seamlessly to various display screen resolutions or person preferences, making certain a constant viewing expertise throughout a number of units.
Binding Occasions and Callbacks with Tkinter Grid
Incorporating interactivity is a crucial facet of GUI improvement. The tkinter grid system permits builders to bind occasions, comparable to button clicks or keystrokes, to callbacks. By specifying these relationships inside the grid, builders can create dynamic person interfaces that reply to person enter whereas sustaining an organized and structured format.
from tkinter import *
from tkinter.ttk import *
root = Tk()
l1 = Label(root, textual content = “First Label:”)
l2 = Label(root, textual content = “Second Label:”)
l1.grid(row = 0, column = 0, sticky = W, pady = 2)
l2.grid(row = 1, column = 0, sticky = W, pady = 2)
e1 = Entry(root)
e2 = Entry(root)
e1.grid(row = 0, column = 1, pady = 2)
e2.grid(row = 1, column = 1, pady = 2)
mainloop()
On this block of code:
-
- Import the “tkinter” module and the “ttk” submodule.
- The first utility window is then created utilizing “Tk()”. The phrase “First Label” and “Second Label” are used to generate the 2 labels, l1 and l2.
- The “grid()” methodology is used to place them within the grid association.
- Every label’s location within the grid is decided by the “row” and “column” parameters. When the “sticky” parameter is about to “W”, labels will adhere to the left facet of their corresponding cells. The “pady” possibility will increase the vertical house between labels and adjoining widgets.
- Utilizing “Entry(root)”, two further entry widgets, e1, and e2, are additionally created. Person enter is dealt with by entry widgets. Just like how labels are inserted, they’re additionally positioned within the grid format subsequent to the labels utilizing the “grid()”
- Lastly, the appliance’s essential occasion loop is launched by way of the “mainloop()” methodology when the labels and entry widgets are configured, enabling the GUI to react to person occasions.
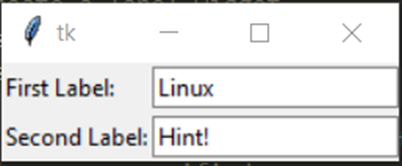
Output

We are able to add textual content within the above appeared textual content containers as follows:
Conclusion
The tkinter grid system stands out as a robust and intuitive instrument for constructing visually interesting and responsive person interfaces in Python. With its complete set of options and capabilities, builders can leverage grid-based layouts to create GUIs which might be each aesthetically pleasing and functionally environment friendly.