
Community bonding combines a number of LAN or Ethernet interfaces right into a single logical interface often called a community bond.
The objective of community bonding is to supply fault tolerance and community redundancy. It additionally enhances capability and improves community throughput relying on the kind of bond created.
Alternatively, Community Bridging entails the creation of a logical interface often called a bridge between two interfaces. This enables visitors to go by way of them and is particularly useful in sharing an web connection between your system and others.
On this lesson, we are going to first take a look at Community Bonding and how one can configure a community bond. Later, we are going to shift our consideration to Community Bridging.
What’s Community Bonding?
Additionally known as hyperlink aggregation, Community Interface Card (NIC) bonding, or just community bonding, is the becoming a member of collectively of two bodily community interfaces right into a single logical interface.
That is completed for redundancy and failover. In case one interface develops an issue or goes down, the remaining interface will nonetheless present the connection required.
Forms of Community Bonds
There are 7 forms of community bonds, every denoted utilizing a mode quantity, i.e. mode=0, mode=1 all the way in which to mode=7.
- mode=0 (Spherical Robin Coverage) – That is the default mode and is predicated on the Spherical-robin coverage. Information packets are transmitted in sequential order from the primary out there slave interface to the final. This mode offers load balancing and fault tolerance.
- mode=1 (Energetic-backup) – That is primarily based on the Energetic-backup coverage. Because the identify infers, just one slave is lively. The opposite one is activated when the present slave fails. The mode offers fault tolerance and redundancy.
- mode=2 (Stability-XOR) – The mode units an Unique OR (XOR) of the supply deal with with the vacation spot MAC deal with.
- mode=3 (Broadcast) – On this coverage, all packets are transmitted on all slave interfaces.
- mode=4 (802.3ad) – That is additionally known as the Dynamic Hyperlink Aggregation mode. It creates aggregation teams with the identical pace. Works on community switches that help the IEEE 802.3ad dynamic hyperlink commonplace.
- mode=5 (Stability-tlb) – That is also referred to as Adaptive Transmit Load Balancing. Right here, outgoing visitors is transmitted primarily based on the present load on every slave interface, whereas incoming visitors is obtained by the present lively slave.
- mode=6 (Stability-alb) – That is also referred to as Adaptive Load Balancing. Load balancing is finished utilizing ARP (Tackle Decision Protocol) negotiation.
Having regarded on the community bond sorts, let’s now change gears and discover the right way to configure a community bond on Ubuntu 20.04.
Step 1: Allow Bonding in Ubuntu
Earlier than anything, step one is to make sure that the ‘bonding’ module is put in and loaded.
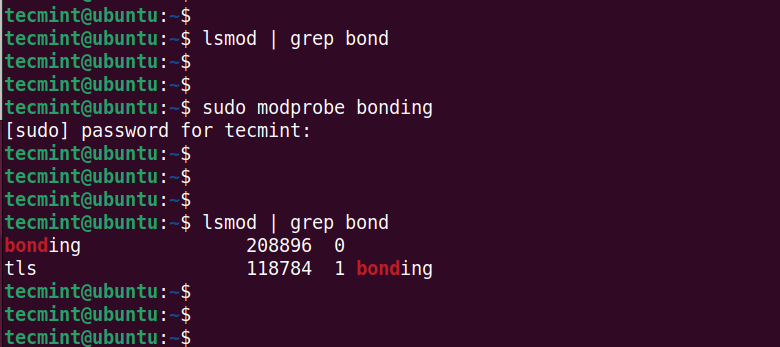
Generally, the module comes pre-installed in fashionable Linux distributions, however not loaded. To examine if the module is loaded, use the lsmod command:
$ lsmod | grep bond
If the module isn’t loaded, the output shall be clean. To load the module, run the modprobe command proven.
$ sudo modprobe bonding
As soon as once more, verify that the module is loaded as follows.
$ lsmod | grep bond
This time, some output shall be printed in your terminal confirming that the module has been loaded.
If the module isn’t put in, set up it utilizing the command:
$ sudo apt set up ifenslave -y
Step 2: Configure a Short-term Community Bonding in Ubuntu
The subsequent step is to configure a community bond. Keep in mind that this may solely be a short lived bond and won’t persist in a reboot.
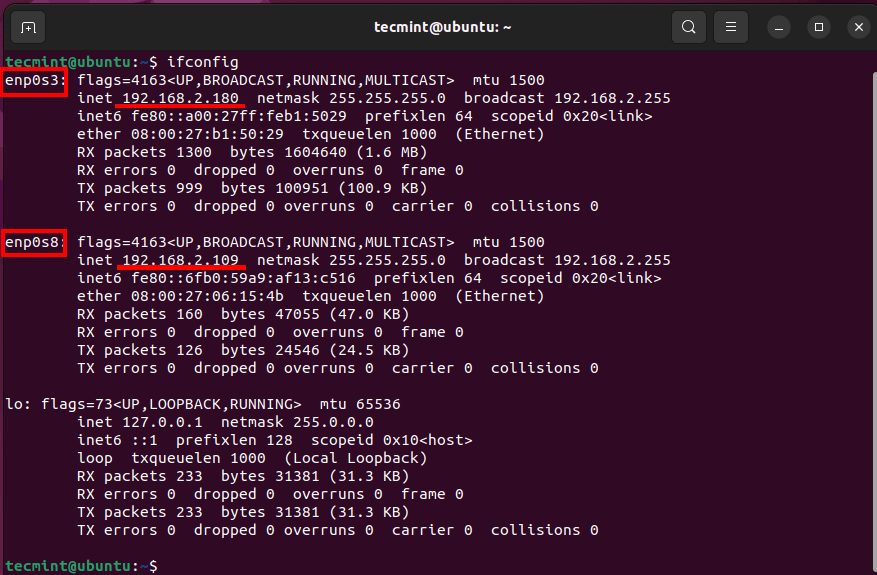
First, Let’s examine the community interfaces within the system by operating the ip command as proven.
$ ip a
From the output, we’ve got two lively interfaces: enp0s3 and enp0s8.

You may also use the ifconfig command.
In case you run into an error when operating the command, set up the net-tools package deal which offers the ifconfig utility.
$ sudo apt set up net-tools
Transferring on, we have to disable the 2 community interfaces.
$ sudo ifconfig enp0s3 down
$ sudo ifconfig enp0s8 down
Subsequent, create a community bond of sort 802.3ad.
$ sudo ip hyperlink add bond0 sort bond mode 802.3ad
Then add every of the community interfaces to the community bond.
$ sudo ip hyperlink set enp0s3 grasp bond0
$ sudo ip hyperlink set enp0s8 grasp bond0
Subsequent, activate your community bond.
$ sudo ifconfig bond0 up
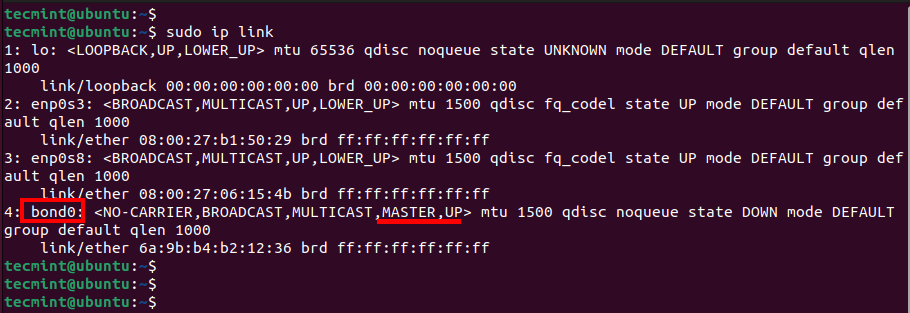
To confirm that the bond has been created, run the command:
$ sudo ip hyperlink
Step 3: Configure a Everlasting Community Bonding in Ubuntu
As earlier talked about, the bond created is barely short-term and can stop to exist upon system poweroff or reboot. To make the modifications everlasting, we are going to edit the Netplan YAML file utilizing the nano editor as proven.
$ sudo nano /and so on/netplan/01-network-manager-all.yaml
After you have opened the file add the next traces to specify the community bond, community interfaces, bond mode, and nameservers.
community:
  model: 2
  renderer: NetworkManager

  ethernets:
    enp0s3:
      dhcp4: no
    enp0s8:
      dhcp4: no

  bonds:
      bond0:
       interfaces: [enp0s3, enp0s8]
       addresses: [192.168.2.150/24]
       routes:
            - to: default
              by way of: 192.168.2.1
       parameters:
            mode: active-backup
            transmit-hash-policy: layer3+4
            mii-monitor-interval: 1

       nameservers:
           addresses:
                - "8.8.8.8"
                - "192.168.2.1"
Right here, we’ve got chosen the bond sort to be active-backup, which offers backup such that in case one interface goes down, the opposite takes over as the first hyperlink.
Save the modifications made and exit the configuration file.
Subsequent, convey down the interfaces.
$ sudo ifconfig enp0s3 down
$ sudo ifconfig enp0s8 down
Subsequent, apply the settings made.
$ sudo netplan apply
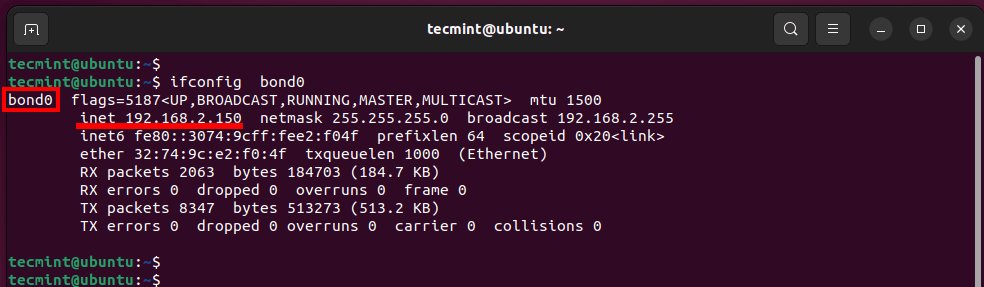
Remember to allow the bond and confirm the bond interface.
$ sudo ifconfig bond0 up
$ ifconfig bond0
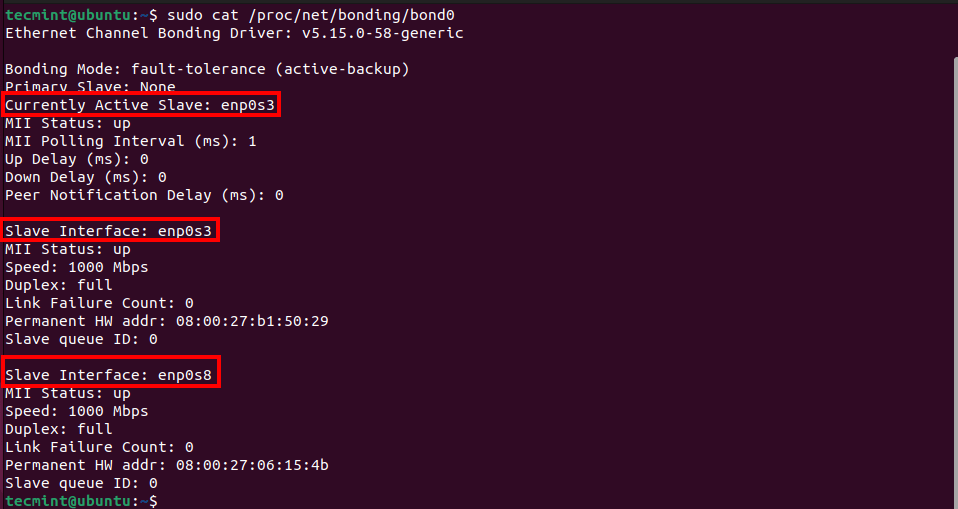
As well as, you’ll be able to examine detailed data concerning the community bond.
$ sudo cat /proc/internet/bonding/bond0
This shows the slave interfaces and at present lively slave interfaces alongside their statistics. On this setup, the present slave interface is enps0s3.
Step 4: Testing Community Bonding in Ubuntu
We’ve got set our community bond to the ‘active-backup’ coverage. That is the place just one interface is lively. In case of failure, the opposite interface takes over because the lively interface.
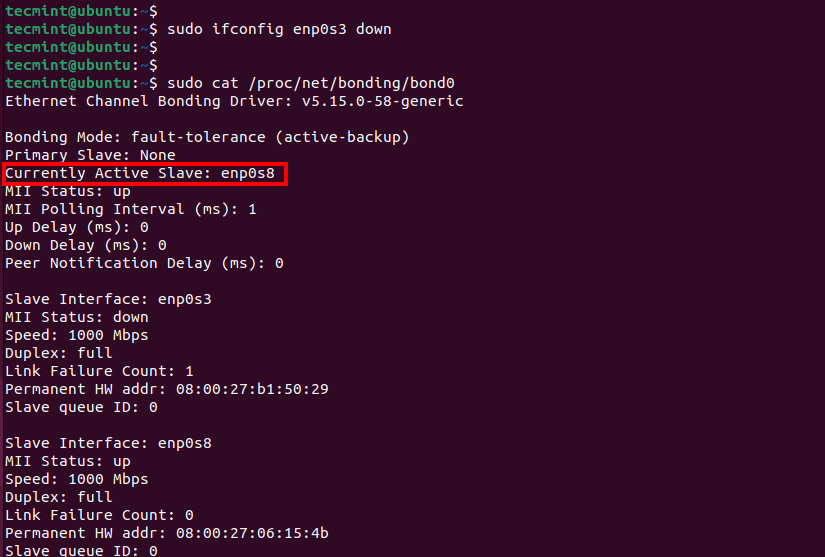
To place this to the check, we are going to disable the enps0s3 interface and examine if the opposite interface will kick in.
$ sudo ifconfig enps0s3 down
After we examine the bond statistics, we see that the enps0s8 interface is now the lively slave interface.
$ sudo cat /proc/internet/bonding/bond0
What’s Community Bridging?
In networking, a community bridge is a tool that connects two LAN networks and controls the move of information packets between them. It features extra like a community change and forwards visitors between networks primarily based on host MAC addresses.
It builds a MAC addresses desk by listening to community visitors from hosts in every community. It’s thought-about a Layer 2 machine because it operates on Layer 2 of the OSI mannequin.
You’ll be able to create a software program bridge in your Linux machine to emulate a {hardware} bridge. In Community bridging, a bridge is created between a number of community interfaces to be able to let visitors move between them. This lets you share the web connection of your host with others.
The bridge acquires an IP deal with dynamically (Utilizing DHCP) or could be manually configured to have a static IP deal with.
On this part, we are going to reveal the right way to create and configure a community bridge on Ubuntu 20.04.
Step 1: Set up Bridge Utils in Ubuntu
Step one is to put in the bridge-utils package deal which offers all of the instruments wanted to create and handle a bridge community.
$ sudo apt set up bridge-utils
Step 2: Create a Community Bridge in Ubuntu
Identical to in networking bonding, you may also create a bridge utilizing the netplan utility. You’ll be able to go about it two methods – you’ll be able to create a bridge utilizing both DHCP or Static IPv4 addressing.
Let’s take a look at how one can accomplish this utilizing each methods.
Create a Community Bridge Utilizing DHCP Addressing
That is probably the most easy approach of making a Community bridge because the bridge interface will purchase an IP dynamically from the DHCP server.
Earlier than anything, let’s listing the lively interfaces.
$ ip a
From the output, we’ve got just one lively community interface – enp0s3 which has been configured utilizing a static IP.

Transferring on, we are going to modify the Netplan YAML file.
$ sudo nano /and so on/netplan/01-network-manager-all.yaml
Paste the next configuration. The enp0s3 interface is now part of the bridge interface.
ethernets:
    enp0s3:
      dhcp4: no

  bridges:
    br0:
      dhcp4: sure
      interfaces:
        - enp0s3
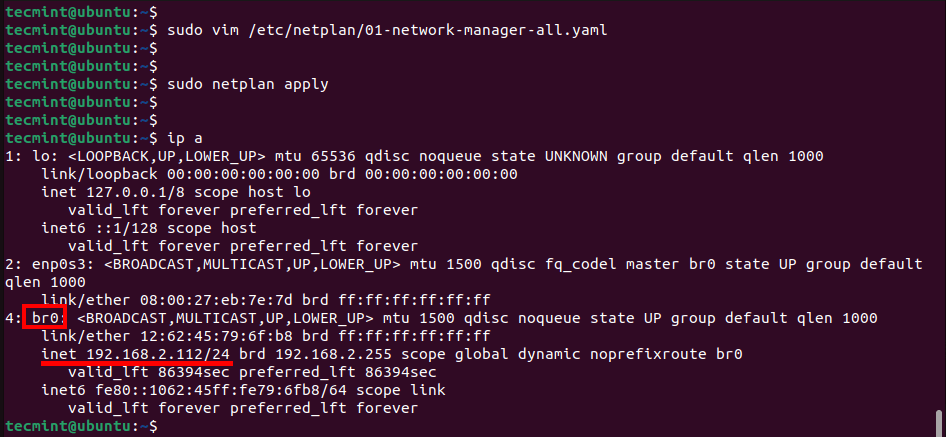
Save the modifications and exit the file. Then apply the configuration made.
$ sudo netplan apply
After about 30 seconds, the bridge interface will come up and robotically obtain an IP deal with by way of the DHCP protocol.
$ ip a
You need to use the nmcli utility to confirm lively connections.
$ sudo nmcli con present --active

Create a Community Bridge Utilizing Static IP Addressing
Alternatively, you’ll be able to configure static IP addressing in your bridge interface and explicitly specify the IP deal with, default gateway in addition to DNS servers.
So as soon as once more, entry the YAML file.
$ sudo nano /and so on/netplan/01-network-manager-all.yaml
Modify the configuration as follows.
ethernets:
    enp0s3:
      dhcp4: true

  bridges:
    br0:
      addresses: [ 192.168.2.200/24 ]
      routes:
        - to: default
          by way of: 192.168.2.1
      mtu: 1500
      nameservers:
          addresses: [8.8.8.8]
      interfaces:
        - enp0s3
On this configuration, 192.168.2.200 is the IP of the bridge interface whereas /24 specifies the subnet masks (255.255.255.0). The gateway IP is 192.168.2.1 and 8.8.8.8 is the DNS deal with.
Save the modifications and exit the YAML file. Then apply the configuration.
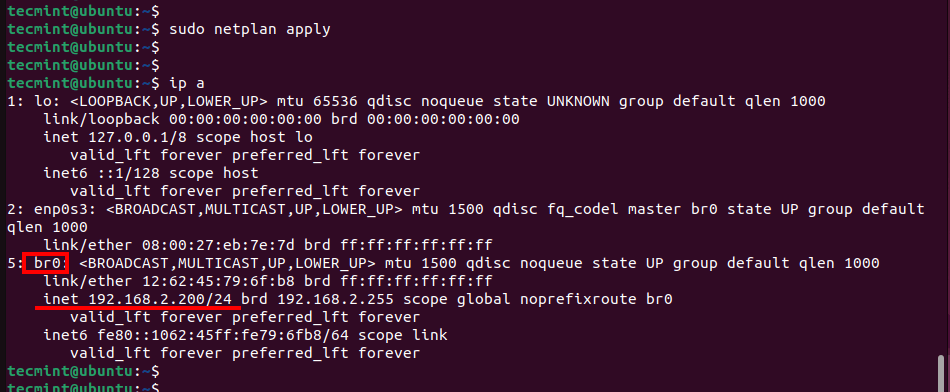
$ sudo netplan apply
Subsequent, very that the bridge interface has been created and bears the static IP addressing assigned to it
$ ip a
From the output, you’ll be able to see that the bridge interface has been created with the static IP assigned to it.
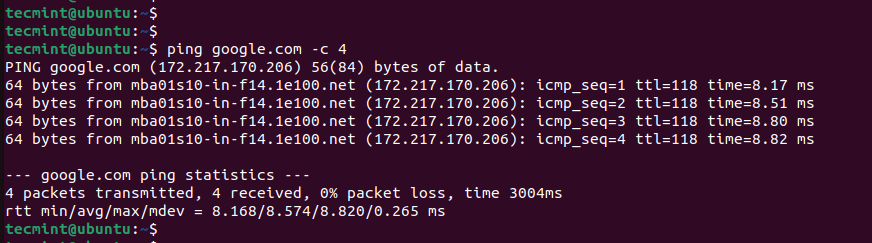
Additionally, you should definitely confirm that you just even have web entry out of your Linux system utilizing the ping command.
$ ping google.com -c 4
Conclusion
On this lesson, we’ve got lined the basics of networking bridging and bonding, and how one can configure bridge and bonding interfaces on a Ubuntu system.