This tutorial explains tips on how to set up and get began with the Snort IDS (Intrusion Detection System) in Debian-based Linux distributions together with Ubuntu.
After organising a server, among the many first standard steps which can be linked to safety are the firewall, updates and upgrades, SSH (Safe Shell) keys, and vulnerability free {hardware} units (like routers with out PIN help).
However most sysadmins don’t scan their very own servers to find safety holes, nor do they arrange honeypots or Intrusion Detection Programs (IDS) just like the one that’s absolutely defined on this information.
This doc explains step-by-step on tips on how to get began with Snort, the preferred IDS. All described steps embrace actual screenshots which makes it straightforward for the reader to comply with them.
Notice: The Debian and RedHat-based Linux distributions set up is defined at https://linuxhint.com/intrusion_detection_snort_tutorial/.
Temporary IDS and Snort Description
Intrusion Detection Programs are visitors and packet analyzing applications to detect anomalies comparable to malicious visitors (offensive scan, smart ports connection makes an attempt, and many others). IDS detects suspicious habits and reviews it to the system administrator.
IDS permits the system directors to arrange the principles that outline the suspicious or forbidden packets to be reported.
Snort is the preferred IDS, most likely additionally the perfect. It lets you implement the predefined guidelines from an up-to-date repository, or to create customized ones. Snort additionally lets you select among the many seven alert modes which can be deeply defined on this article.
Getting Began with Snort
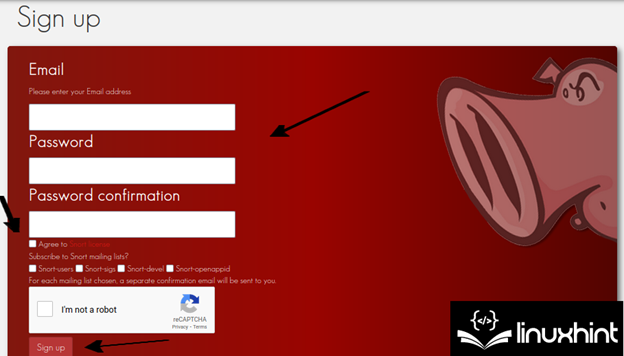
To start with, the person must register at https://www.snort.org/customers/sign_up which is the official Snort web site.
Fill all of the required data, conform to the Snort license phrases, validate the captcha, and press the “Signal Up” button.
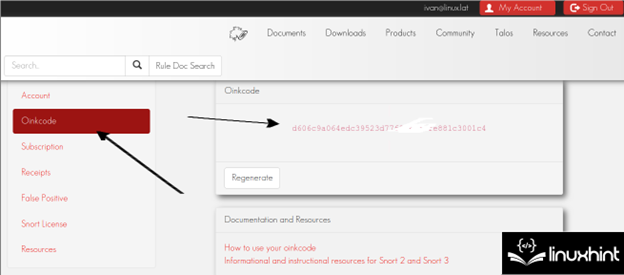
After registering, the person should confirm the affirmation e-mail. As soon as confirmed, login. On the left menu, press the “Oinkcode” button to entry the referred to as Oinkcode which is proven within the following screenshot which is helpful to replace Snort. Customers simply have to maintain the Oinkcode or entry it when mandatory as defined within the following:
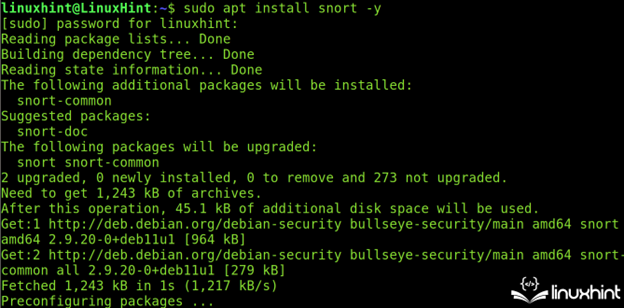
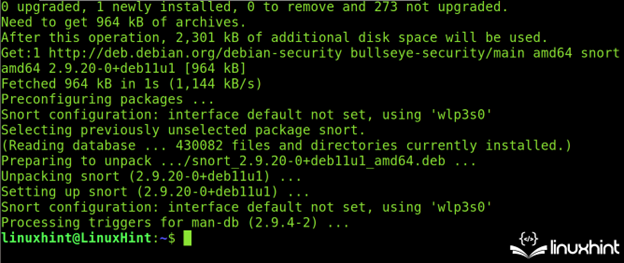
As soon as registered (or earlier than it, that’s detached), Snort might be put in with the apt packages supervisor as proven within the following:
sudo apt set up snort -y
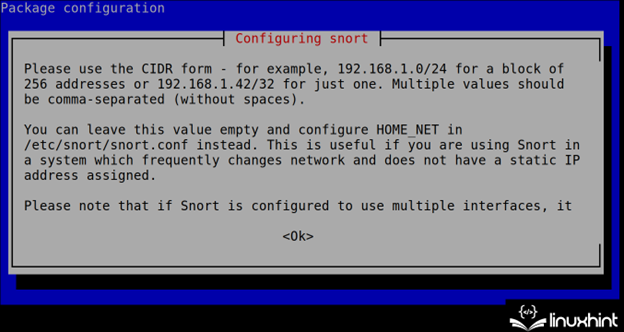
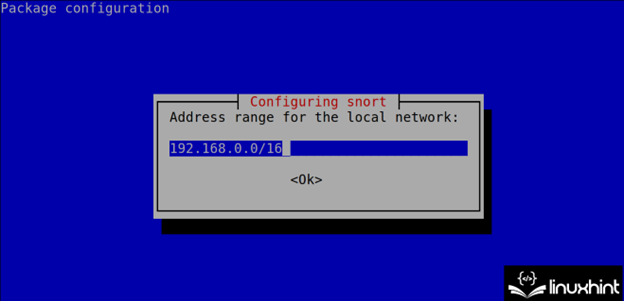
In the course of the set up course of, Snort exhibits you tips on how to specify the community(s) within the subsequent step (CIDR). This configuration might be edited and is saved within the /and many others/snort.conf file as defined within the subsequent part of this tutorial.
To proceed the set up, press the TAB key to pick out the <OK> button. Then, press the ENTER key.
Outline your community(s) in CIDR format as instructed within the earlier step. Normally, Snort mechanically detects the community(s) accurately. In case you need to outline the extra networks, implement a comma.
Snort will finish the set up course of. The primary really useful step is to replace the principles utilizing the Oinkcode that’s obtained within the second step of this Snort tutorial.
The Oinkcode is carried out along with the put in Snort model within the following URL format the place <Model> should be changed with the put in model (with out dots) and <Oinkcode> should be changed with the Oinkcode.
https://www.snort.org/guidelines/snortrules-snapshot-<Model>.tar.gz?oinkcode=<OinkCode>
Within the following instance, the put in Snort model is 2.9.151 and the Oinkcode is d606c9a064edc39523d77f8762f0fe881c3001c4.
To obtain the up to date guidelines, run the next:
https://www.snort.org/guidelines/snortrules-snapshot-29151.tar.gz?oinkcode=d606c9a0edc393d77f8762f0fe881c3001c4
The executed URL downloads the compressed rule information.
The “tar.gz” file content material should be extracted to the /and many others/snort/guidelines listing. You should use the “xzf” command and the -C flag to specify the extracted information vacation spot as proven within the following screenshot:
sudo tar xzf snortrules-snapshot-29151.tar.gz -C /and many others/snort/guidelines

After executing all earlier directions, the person can assume that Snort is correctly put in together with the newest guidelines. But some settings should be configured as described within the following part.
Configuring Snort in Ubuntu (The Snort.conf File)
The Snort configuration file is /and many others/snort/snort.conf. It’s the first file that the person must take care of after set up.
Notice: For Debian customers, the Snort configuration file is /and many others/snort/snort.debian.conf.
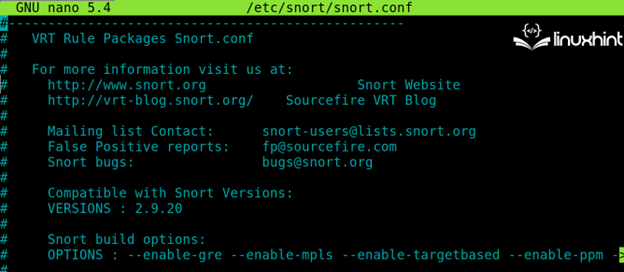
To start, open the /and many others/snort.conf file utilizing a textual content editor as proven within the following (use privileges):
sudo nano /and many others/snort/snort.conf

Within the following illustration, you’ll be able to see how the “snort.conf” file appears to be like like:
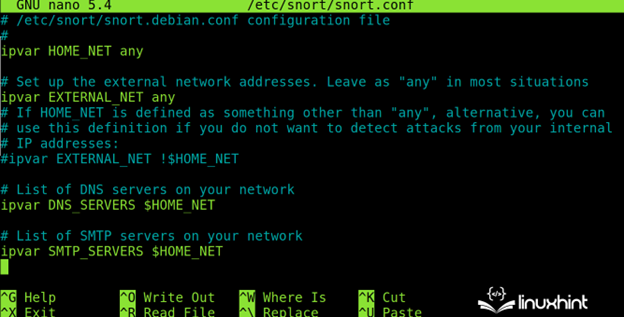
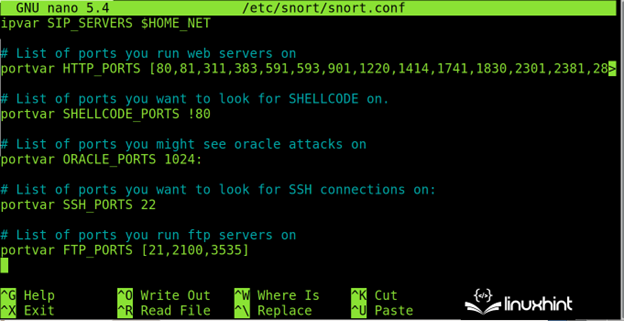
By scrolling down, the person will see the community associated settings. As you’ll be able to see, the default setting for the native community is “any” which instructs Snort to observe all detected subnetworks.
The primary Snort community settings features are the next:
- ipvar HOME_NET: Right here, the person specifies the native community(s) in CIDR format. The default possibility (any) checks all of the native community(s).
- ipvar EXTERNAL_NET: Right here, the person can outline the exterior community.
- ipvar <SERVICE> $HOME_NET: The person will see an inventory of providers on this format the place the <SERVICE> should be changed with the providers to be monitored like HTTPS, FTP, SSH, and many others.
Scroll down for extra service and port choices just like the one that’s proven within the following:
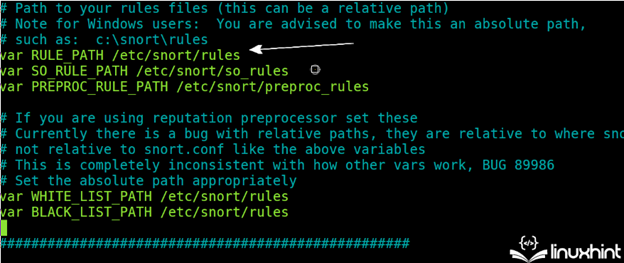
Preserve scrolling down and make it possible for the principles listing is accurately specified as proven within the following picture (/and many others/snort/snort.conf):
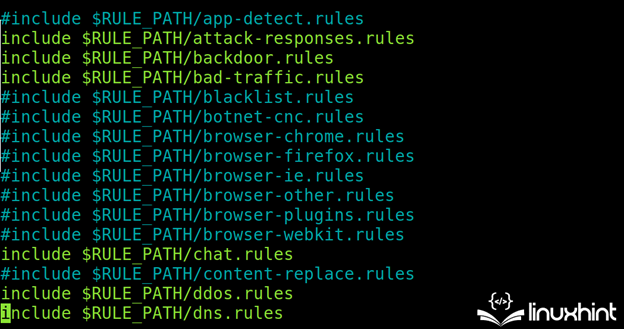
Within the following illustration, you’ll be able to see the commented (enabled) or uncommented (disabled) guidelines. As you’ll be able to see, the principles are saved within the /and many others/snort/guidelines listing and are managed from the “snort.conf” file.
Within the following screenshot, the assault response, unhealthy visitors, DDOS, backdoor, and many others. associated guidelines are enabled:
All guidelines might be discovered within the /and many others/snort/guidelines listing.

The customers not solely can obtain the extra guidelines however they will additionally create their very own. To learn to create the customized Snort guidelines, comply with this hyperlink.
Snort Alerts
Alert modes are a sequence of obtainable reporting mechanisms for the customers to decide on.
The Snort IDS helps seven alert modes together with a testing alert mode and never alerts in any respect mode.
Full: The complete alert mode, as its title suggests, returns probably the most full report together with the datagram detailed data. The complete mode is outlined by including the -A full flag.
Quick: The quick mode, which is carried out utilizing the -A quick flag, is extra person pleasant than the total mode.
Console: The -A console possibility prints the true time alerts on the Linux terminal.
Syslog: The System Logging Protocol sends the alert logs remotely. Implement this mode utilizing the -s flag.
Unsock: Snort can export an alert to the Unix sockets.
None: Skip alerts.
Cmg: The CMG mode is just used for testing functions.
Notice: Like Snort guidelines, Snort alerts deserve a devoted tutorial which you can entry at https://linuxhint.com/snort_alerts/.
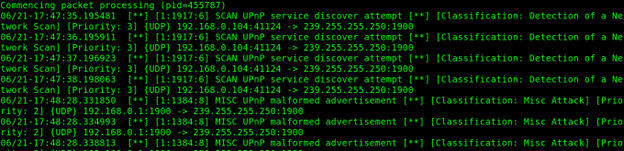
Within the following instance, the -h flag specifies the host or community. Snort is executed with the -A flag which implements the console alert mode. The -c flag is printed to the Snort configuration file.
sudo snort -d -h 192.168.0.0/24 -A console -c /and many others/snort/snort.conf
Within the subsequent instance, a quick scan is executed.
sudo snort -A quick -c /and many others/snort/snort.conf
By default, Snort outcomes are saved below the /var/log/snort listing as proven within the following screenshot:

Conclusion
Snort like IDS are glorious instruments to detect malicious habits inside a community. It may well detect the outlined scan strategies and report the information on the supply. However Snort might be configured towards all sorts of suspicious visitors. Snort features a complete guidelines supply that’s straightforward to configure and maintain up to date. Customers can write the customized guidelines and select the completely different alert modes.
IDS implementation is a fundamental requirement to safe the networks which can be included within the Linux safety hardening checklist.
Snort is an open supply and is a straightforward to handle safety useful resource. It may be used without cost which serves as a great various for a lot of customers. We extremely suggest you to proceed studying our articles which can be quoted with hyperlinks on this doc that are devoted to every facet of Snort.