![Set up and Use Ventoy on Ubuntu [Complete Guide]](https://itsfoss.com/content/images/2023/07/install-ventoy-on-ubuntu-linux.png "Set up and Use Ventoy on Ubuntu [Complete Guide]")
Being a distro hopper, I can relate to the ache of getting one ISO picture on a flash drive. However not anymore!
In case you always distro hop, otherwise you simply wish to carry a number of ISO information in a single pen drive, there’s a answer – Ventoy.
On this information, I am going to stroll you thru the next:
- Putting in Ventoy on Linux
- Making a reside Linux USB
- Booting from Ventoy
- Utilizing a number of Linux distros on a single USB
- Creating Home windows bootable USB
So let’s begin with the primary one.
Set up Ventoy on Linux
Ventoy just isn’t accessible within the default repositories or third social gathering repos on Ubuntu or some other Linux distribution. This merely means you can’t use apt to put in the bundle.
So on this case, we’ve to put in Ventoy from supply. Fret not, you simply have to observe alongside the steps under, it’s simple.
📋
You need to use this technique for any Linux distribution as there’s one method to set up Ventoy and that is from supply.
1. Go to the official obtain web page of Ventoy and select the file ending with linux.tar.gz:

2. Now, open your terminal and use the cd command to navigate to the place the Ventoy file was downloaded. For many customers, it is going to be the Downloads listing:
cd DownloadsThe Ventoy binaries are shipped within the type of the tarball and to untar (or extract) the bundle, you possibly can use the tar command as proven:
tar -xzvf ventoy-*.tar.gz3. As soon as extracted, you will see that a listing of Ventoy. Use the cd command to get into that listing.
In my case, it was ventoy-1.0.93, so I will probably be utilizing the next:
cd ventoy-1.0.93In case you record the listing contents, you will see that that there are a number of scripts:
ls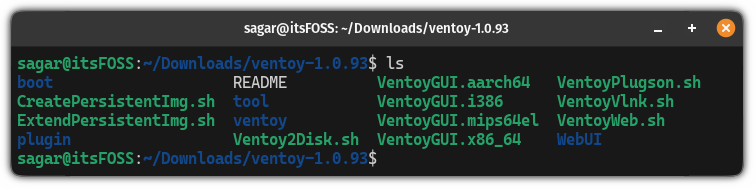
However what you want is VentoyWeb.sh which lets you flash your drive utilizing your browser with none instructions.
4. To execute the script, use the next command:
sudo ./VentoyWeb.sh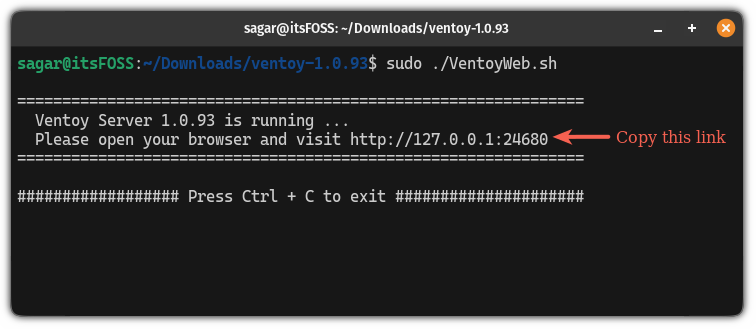
As you possibly can see, it began the Ventoy server and to entry it, copy the given URL and paste it to the tackle bar of your browser.
When you try this, it would appear like this:
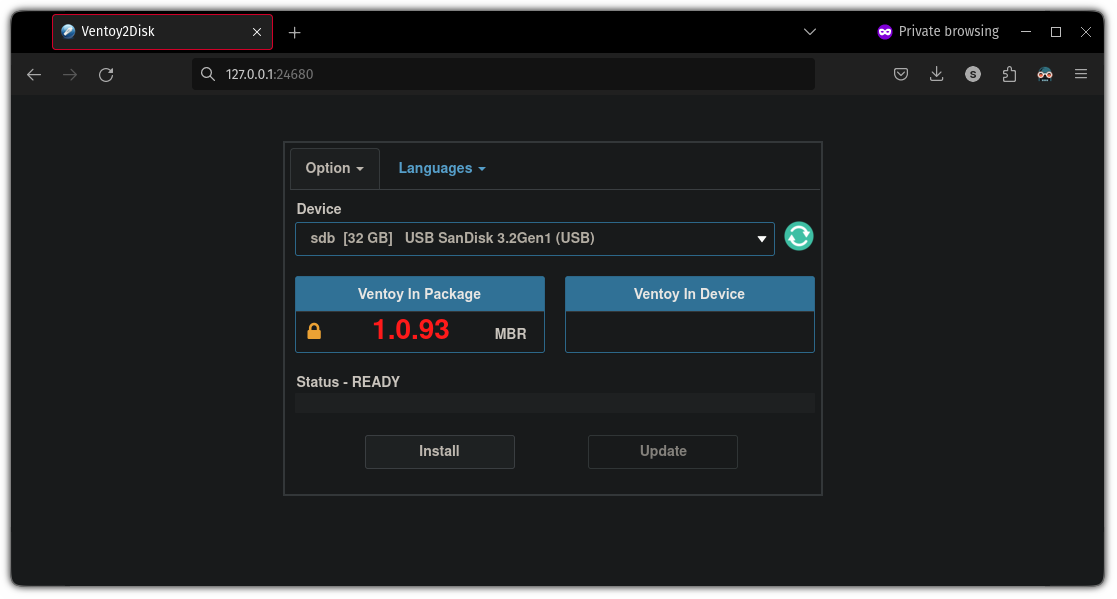
By default, it is going to be enabled to work with the safe boot choice and that is the explanation it exhibits the 🔒 (lock) image with the model title.
I don’t suggest you alter this setting, however if you need to, you possibly can disable this selection from the Choice→Safe boot Help:

As soon as carried out, choose the storage path on which you wish to set up Ventoy and hit the Set up button.
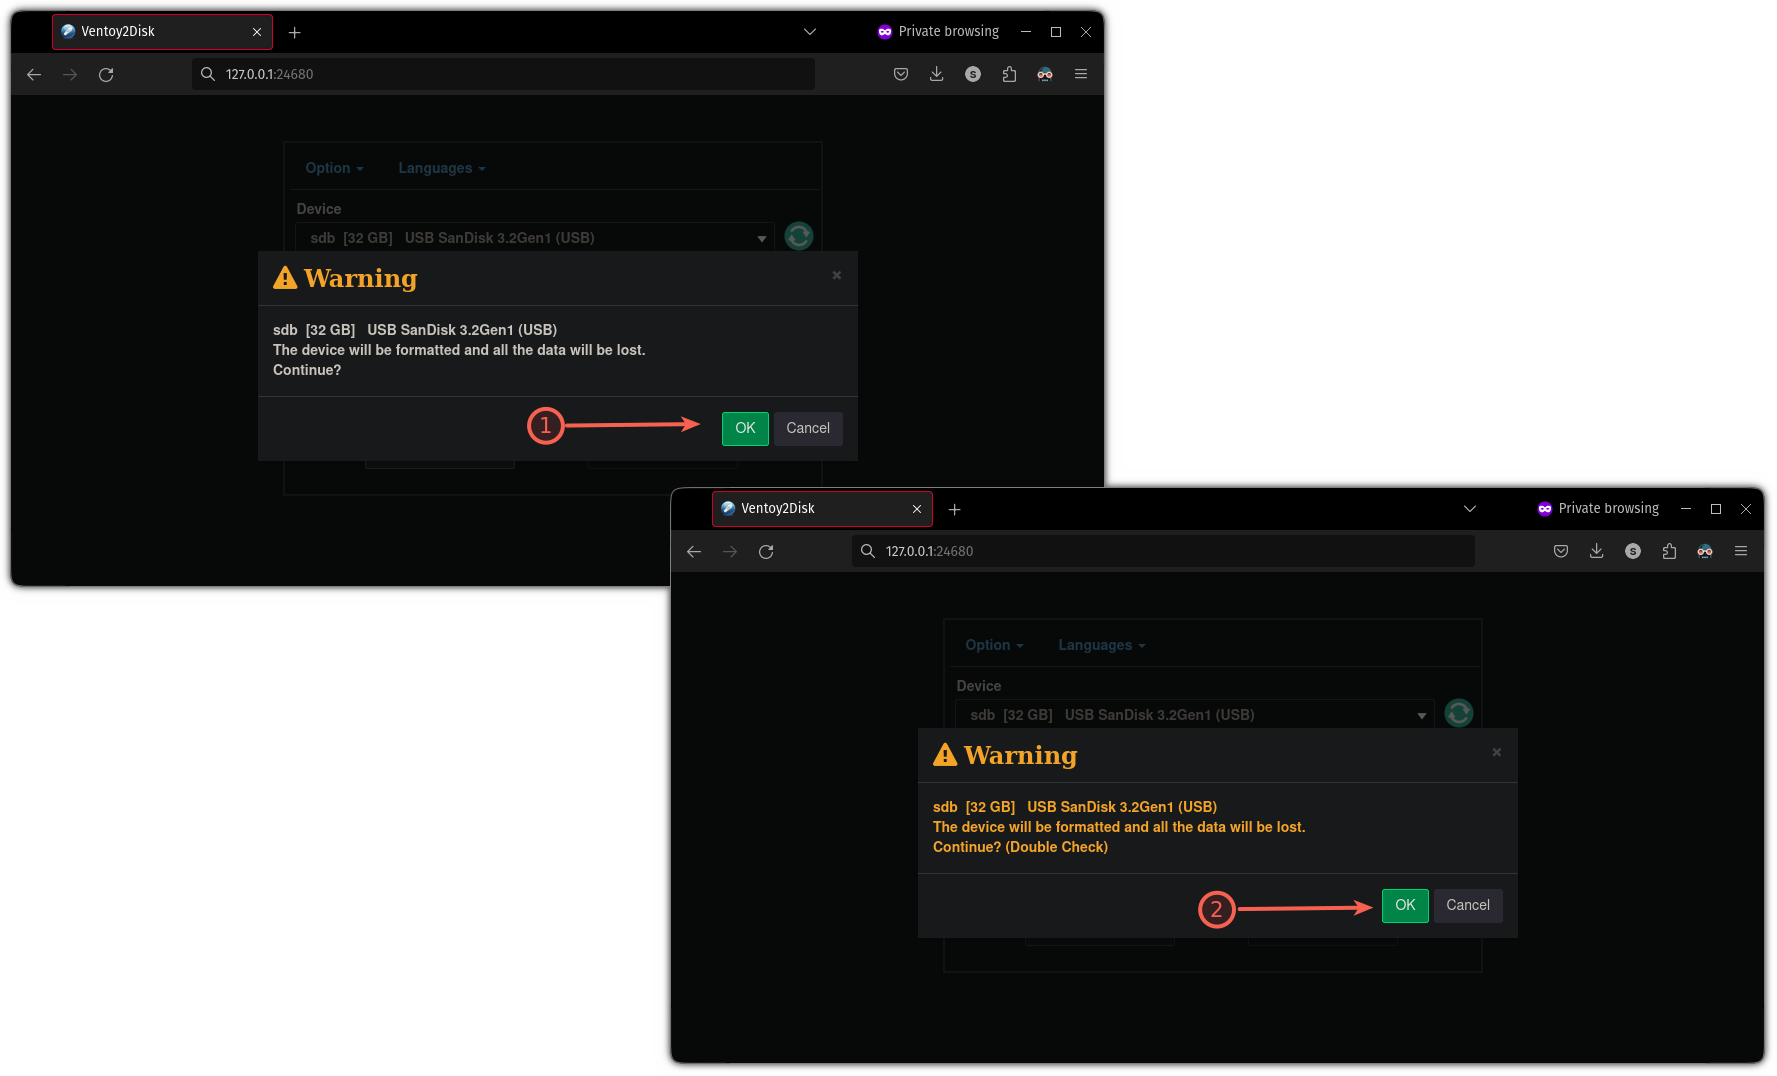
Earlier than putting in, it would ask you to verify the drive two instances as it would format the drive, so ensure to take a backup of vital information (if there’s any):
As soon as carried out, you will notice a message—”Ventoy has been efficiently put in to the machine“:
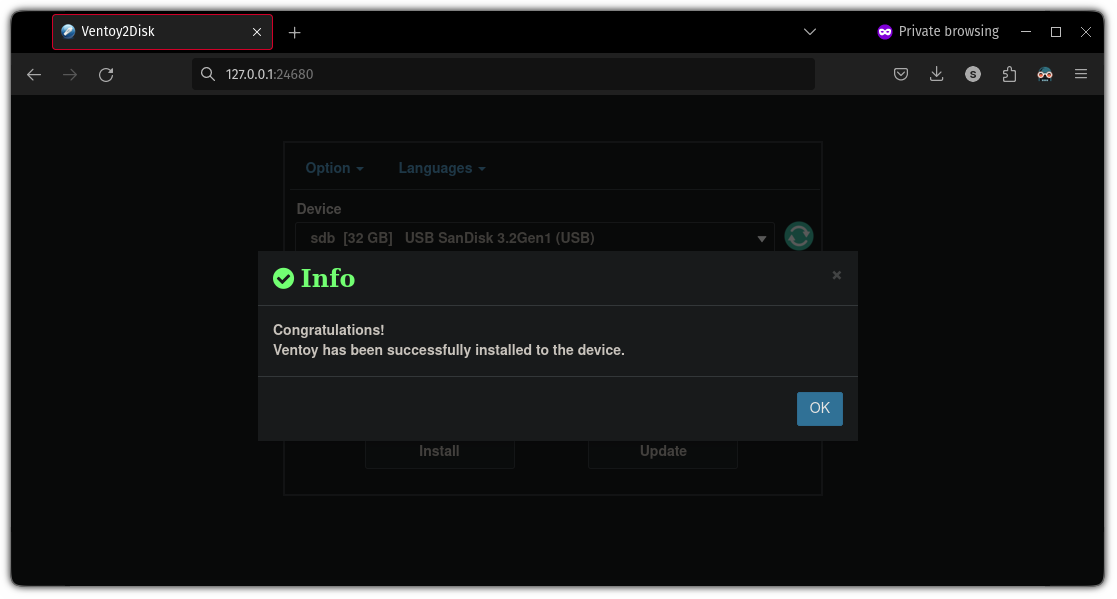
And the set up is completed.
Create a Reside USB with Ventoy
To create a Reside USB with Ventoy, first, you want to obtain an ISO picture of your most well-liked working system.
Whereas Ventoy ought to help nearly the whole lot, I’d nonetheless suggest checking the compatibility from their official web page.
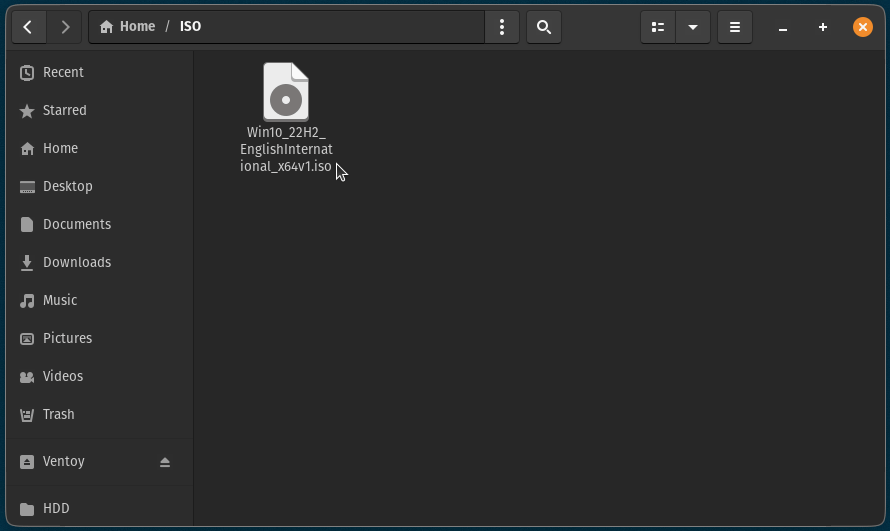
To make the USB bootable with Ventoy, all it’s a must to do is paste the ISO file to the Ventoy drive. Sure, it is so simple as that! 🤯

📋
If you wish to verify the hash of the ISO file for file integrity, you will discover the steps talked about under.
Utilizing GtkHash to verify the hash (non-compulsory)
Whereas Ventoy does can verify the hash, it will probably solely be used while you boot with Ventoy and most customers will not have one other system to match the hash.
So it’s a good suggestion to verify the hash sum on a working system.
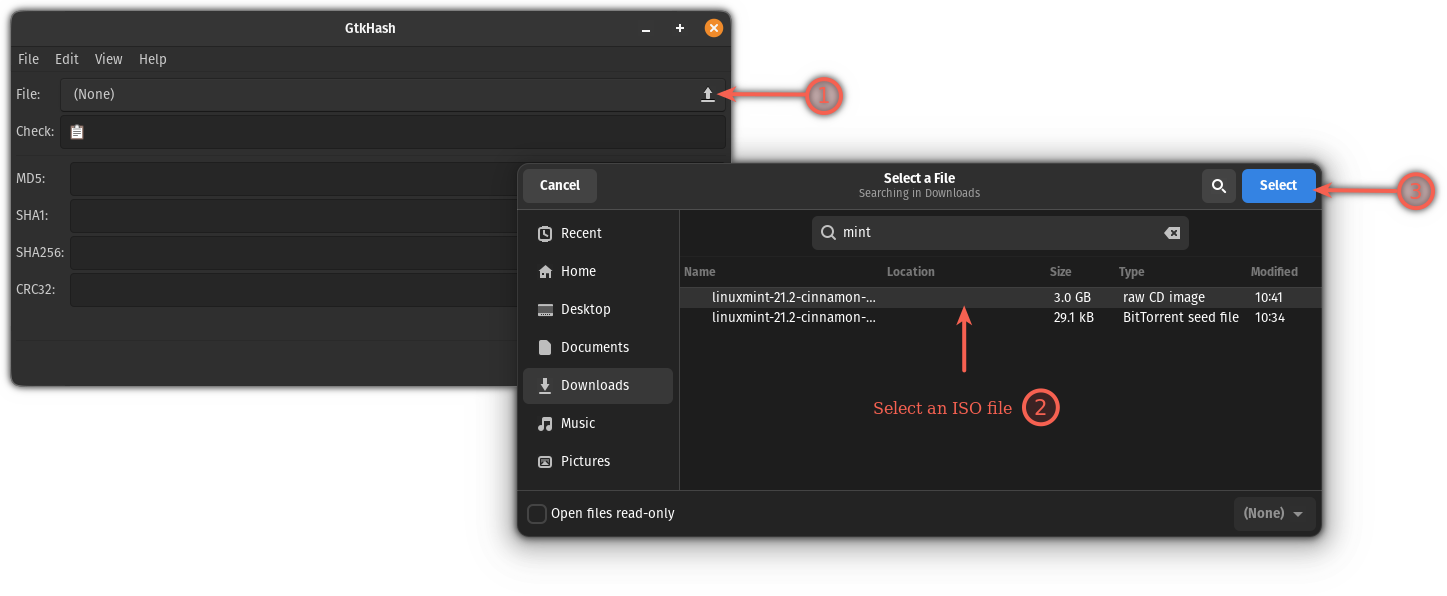
To verify the hash, I’d suggest utilizing GtkHash which is an easy GUI software that allows you to verify the hash for the information.
It’s accessible as a Flatpak so if you have not enabled flatpak, then, you possibly can seek advice from our detailed information on utilizing Flatpak on Linux. Your software program heart could embody help for it, so that you would possibly wish to verify that too.
As soon as setup, you need to use the next command to put in it in your system:
flatpak set up flathub org.gtkhash.gtkhashAfter set up, begin GtkHash out of your system menu and observe two easy steps to verify the hash worth:
First, choose the ISO file:
And paste the hash from the web site you bought the ISO file within the Verify subject, then press the Hash button:
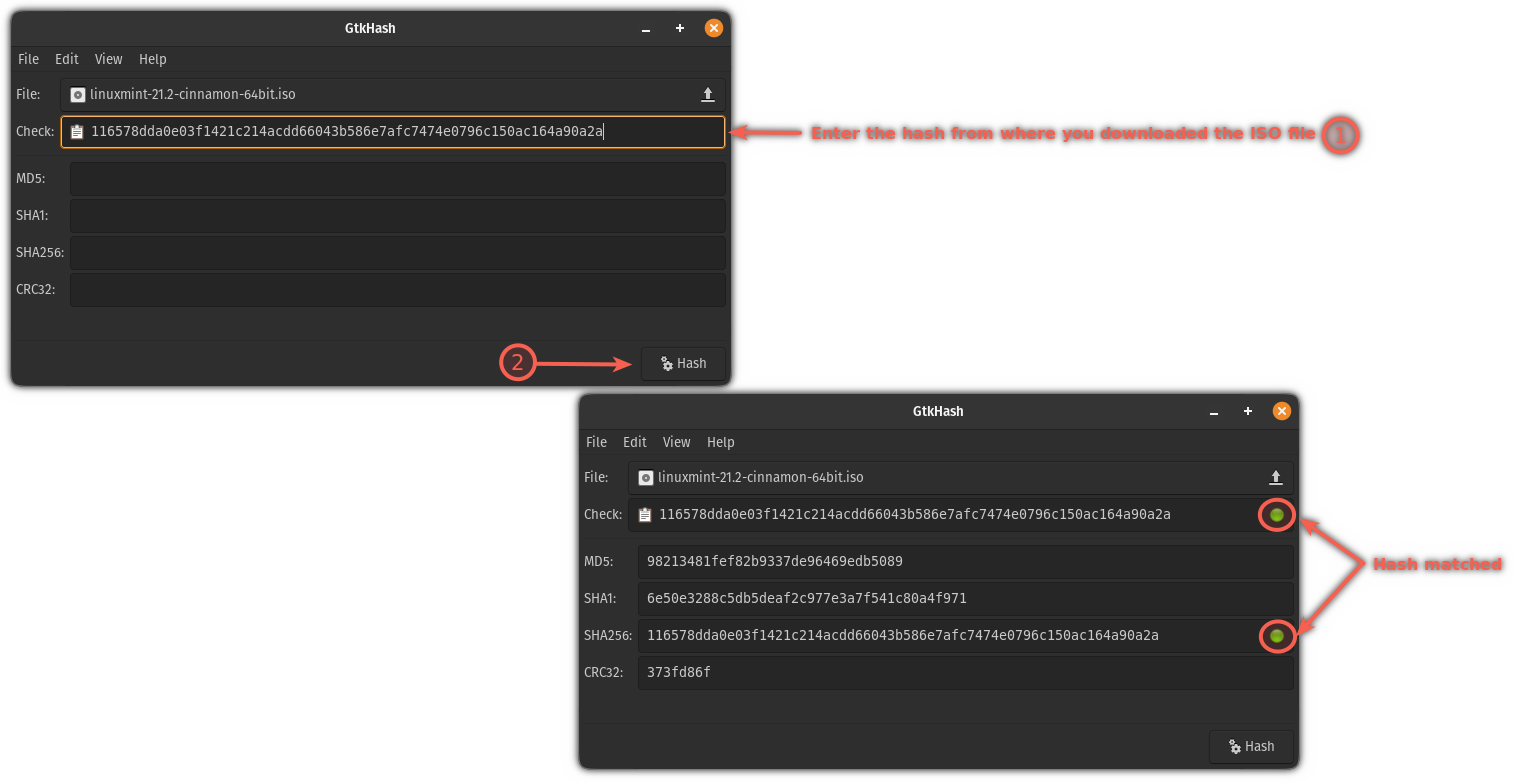
As you possibly can see, it exhibits a inexperienced sign 🟢 that means, the hash matched!
Boot Utilizing Ventoy USB Drive
Earlier than I stroll you thru the boot course of, there are two modes that it’s best to take into account if the ISO would not boot.
GRUB2: If any of your Linux distros would not boot, it’s possible you’ll allow theGRUB2mode by urgentCtrl + r. Bear in mind, it would solely work with distros having a grub2 config file.WIMBOOT: In case you run into issues whereas booting Home windows ISO, you possibly can allow the wimboot mode by urgentCtrl + w.
📋
It’s best to solely be utilizing any of the given modes if the default settings don’t give you the results you want.
When you can reboot your system and press F12, del, F2, or different respective keys to get into the BIOS, you may as well select to make use of the terminal in the event you like.
To get into the BIOS of your system whereas utilizing Linux, all it’s a must to do is use the next command in your terminal:
systemctl reboot --firmware-setupIf you wish to boot from Ventoy each time you begin your system with the flash drive, head to the boot menu and alter the boot priorities with Ventoy’s USB drive as the primary.
If not, you possibly can merely use the boot menu each time and choose as well from it Ventoy manually (overriding the defaults).
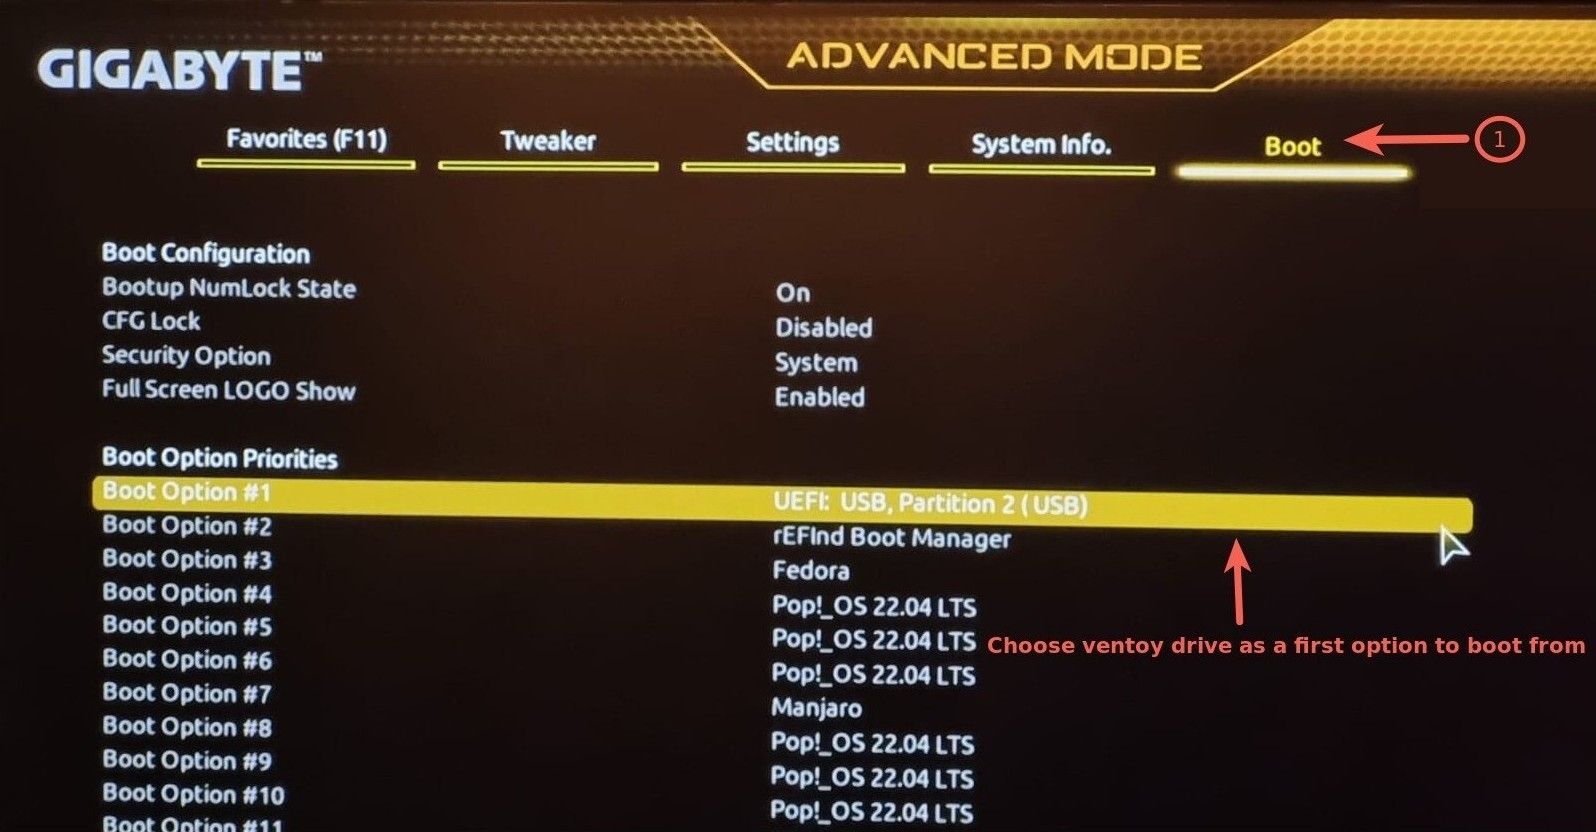
Now, save adjustments and exit from the BIOS (as per your preferences), and you will notice a Ventoy display with one or a number of distros:

This is the way it appears like with a number of distros onboard:
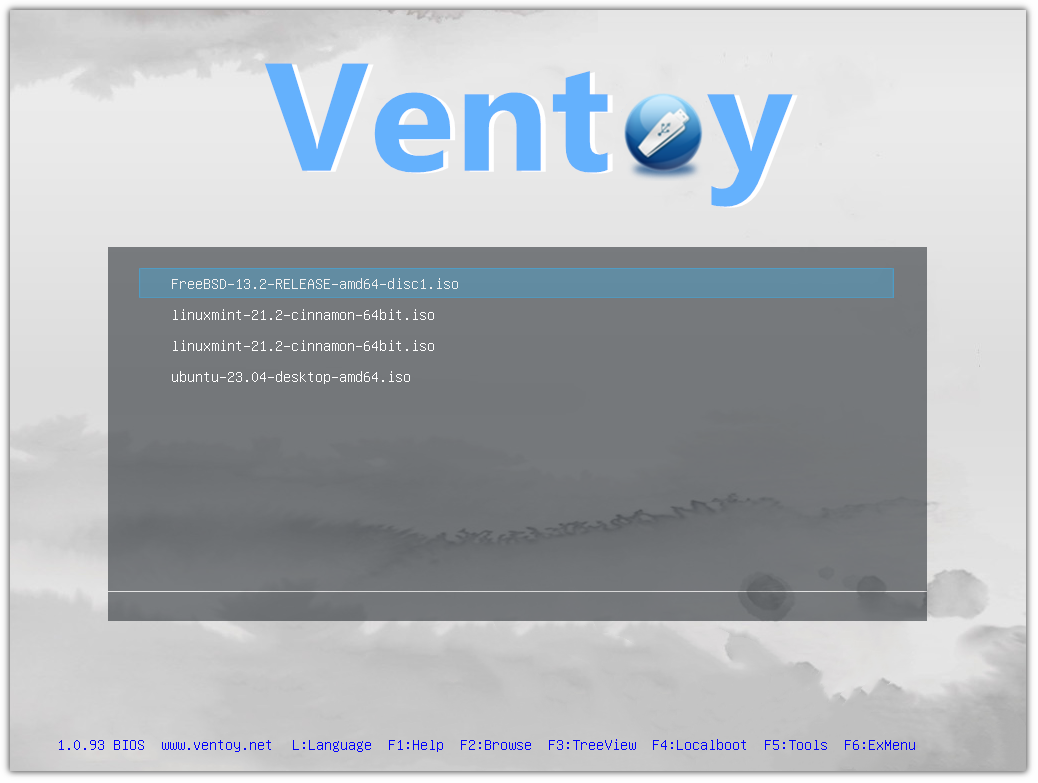
You need to use the arrow keys to navigate by means of the a number of choices.
And in the event you select the Linux distro as I did, then by urgent the enter key on the distro choice, you will notice the next choices:
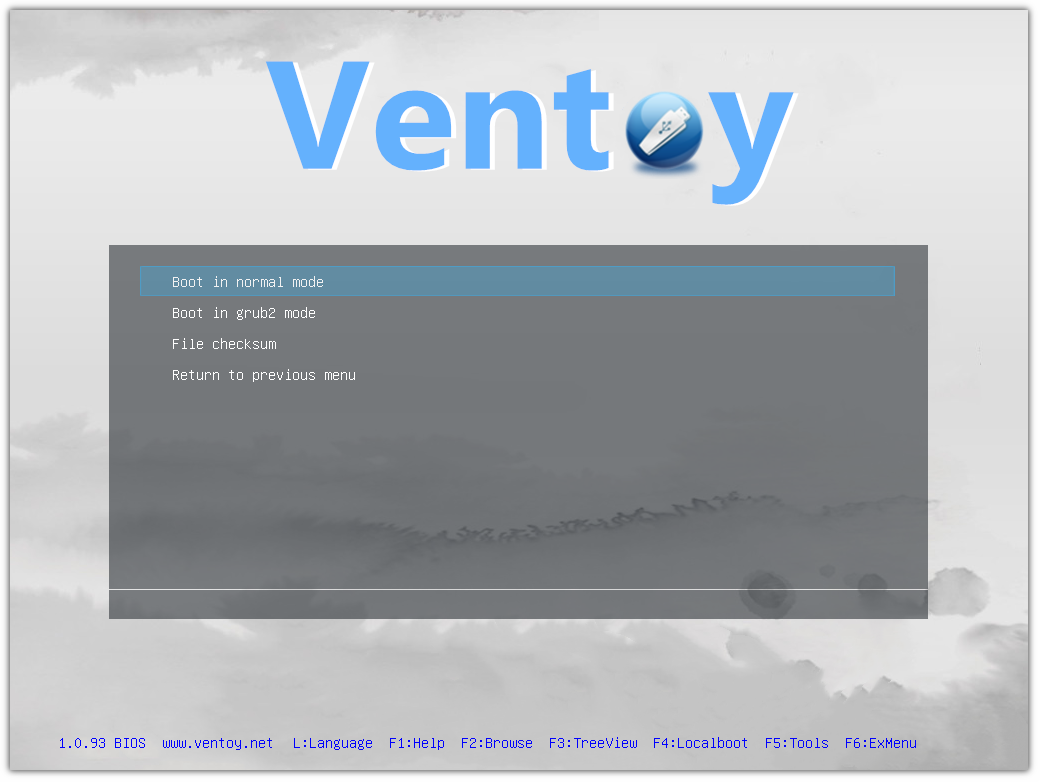
Boot from the traditional mode (chosen by default); if it would not work, you possibly can boot from the grub2.
Study Linux Rapidly – Linux Instructions for Newcomers
Study Linux Rapidly doesn’t assume any prior Linux information, which makes it an ideal match for inexperienced persons. Nonetheless, intermediate and superior Linux customers will nonetheless discover this e-book very helpful because it goes by means of a variety of matters. Study Linux Rapidly will educate you the next matters:Insta…
Use a number of distros in Ventoy
To use the a number of distros on a single USB, all it’s a must to do is copy a number of ISO information within the Ventoy disk drive:

Sure. It is that straightforward. Need extra particulars? This detailed article will assist you to with that.
Find out how to Set up A number of Linux Distributions on One USB
Transient: This tutorial exhibits the steps you possibly can take to create a reside USB stick that permits you to boot into greater than Linux distributions while not having to re-image the drive. You in all probability already know that you may create a reside USB of a Linux distribution and check out it on

Create a Home windows bootable USB
The method for making a bootable Home windows USB stays the identical, however this time, it’s a must to copy the Home windows ISO file to the Ventoy drive. However let me stroll you thru it with the intention to keep away from any confusion.
So, now if you’ll boot from Ventoy, you will notice a Home windows ISO file. I went with Home windows 10, so mine appears like this:
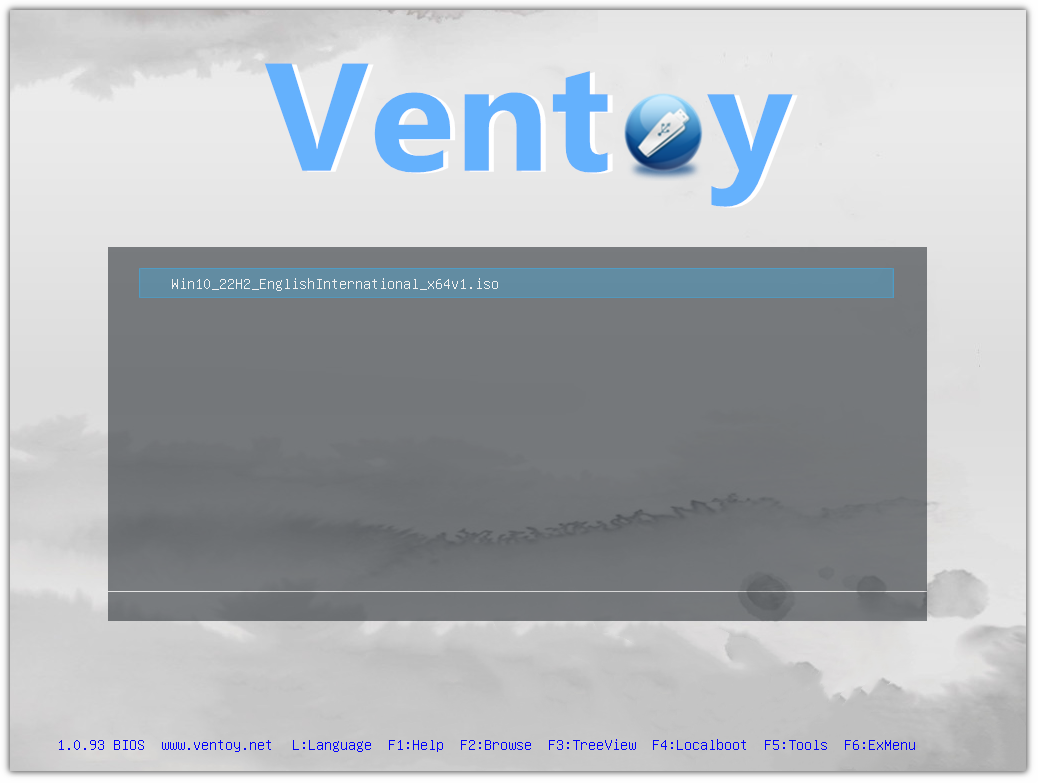
When you press enter, you will notice a little bit totally different boot menu in comparison with what it displayed with Linux distros on the flash drive:
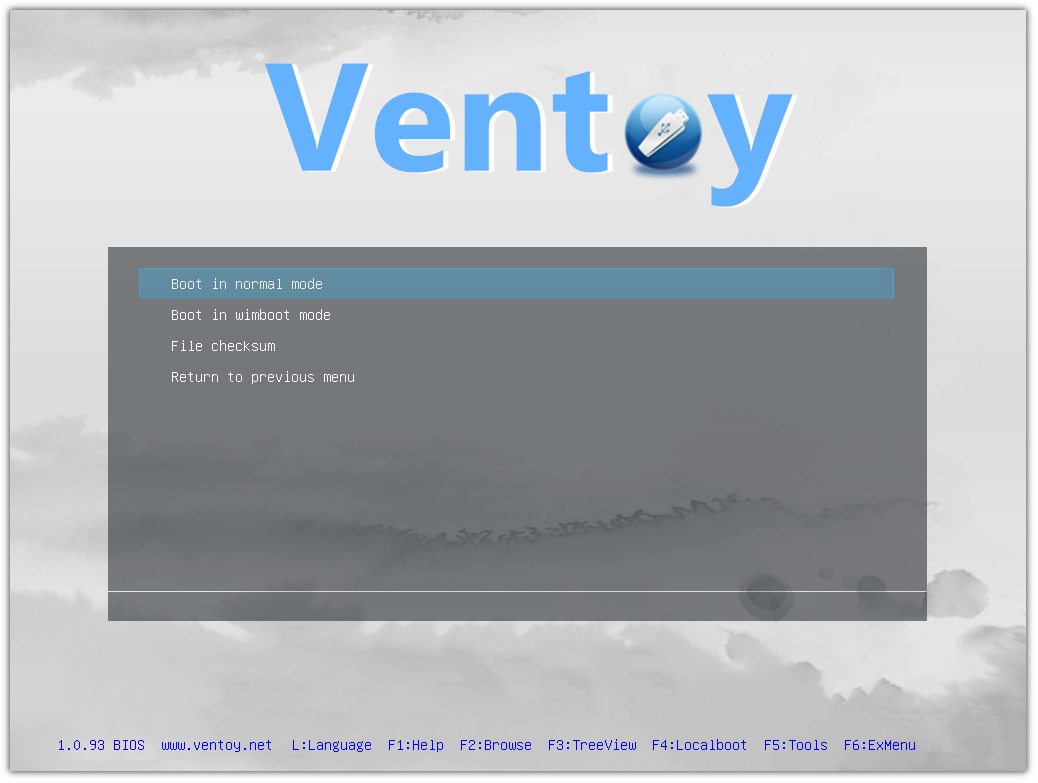
In case you discover rigorously, it added Boot in wimboot mode an choice.
First, attempt with the traditional mode and if it doesn’t work, use the wimboot mode.
Find out how to Create a Bootable Home windows 10 USB in Linux
Transient: This tutorial exhibits you find out how to create a bootable Home windows 10 USB in Linux with and with out a GUI software referred to as Ventoy. I’ve talked rather a lot about creating bootable USB of Linux in Home windows. How in regards to the different manner spherical? How about making a bootable Home windows 10 USB
Wrapping Up
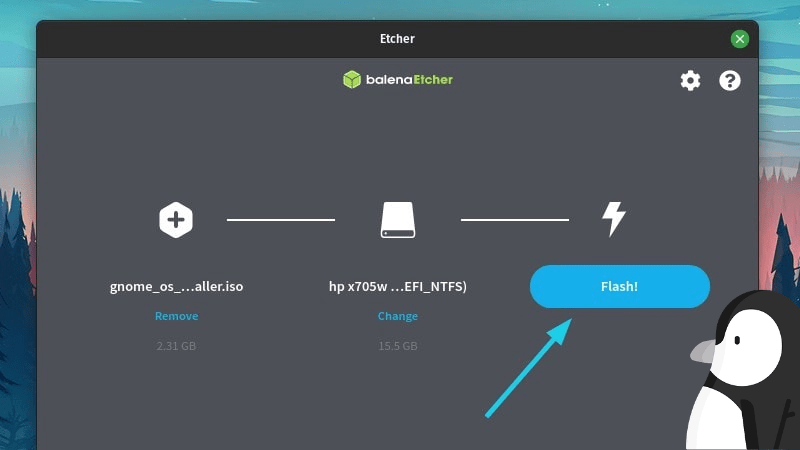
I have been utilizing Ventoy for the previous two years and I can not recall any state of affairs the place it backfired! It really works like a appeal. Some folks, like my colleague Ankush, favor Etcher for creating reside USBs. That too is an efficient software however I favor Ventoy.
Set up and Use Etcher on Linux for Making Reside Linux USB
Etcher is a well-liked USB flasher app for creating bootable Linux USB drives. Let me present you find out how to set up it and find out how to use it for making a reside Linux disk.
However I am curious to know the way you make the most of Ventoy and your experiences 🤔
💬 Remember to share your ideas within the feedback field under.