Printed on: January 18, 2024
Having a neighborhood git repository is a brilliant factor to do. It’s even smarter to push your native git repositories as much as a distant server so that you could collaborate with others, clone your repository on a separate machine, or have a backup of your code in case you’re changing your present improvement machine with one other. A probably much less apparent good thing about internet hosting your git repository someplace is that plenty of git servers present helpful options like Pull Requests for code opinions, problem monitoring, and extra.
On this submit, you’ll study how one can arrange a brand new repository utilizing GitHub, join your native repository to it, push code, clone your repository on a brand new machine, and extra. The aim of this submit is to offer you an excellent overview of the sorts of options and workflows that you just unlock when you’ve acquired your git repository arrange with a distant like GitHub.
I’m selecting to make use of GitHub on this submit as my distant as a result of it’s one of the crucial well-known and extensively used git platforms on the market. It’s not the one one, and it actually doesn’t imply that the others aren’t value utilizing. Platforms like GitLab and Microsoft Azure Repos work nice too.
Making a distant git repository
In the event you don’t have a GitHub account but, that’s the very first thing you’ll need to do. You’ll want to have an account to be able to use GitHub.
After you have your account arrange, you may create a brand new repository by clicking on the “New” button on the web page that’s offered as your principal web page. You may as well click on right here to create a brand new repo.
When you’re on the brand new repo web page, you’ll see a type that appears as follows:

As your repository title it’s best to decide a brief and easy title that displays your challenge. Often I decide the title of the app I’m engaged on and exchange all area characters with dashes.
As an outline in your repository you may write a brief sentence about your challenge.
In case your working in your challenge alone and also you need to forestall anyone from discovering and cloning your challenge, ensure you set your challenge to Personal. If you wish to permit individuals to find, browse, and clone your code it’s best to maintain your repository Public. That is particularly helpful should you intend to open supply your challenge in some unspecified time in the future.
You may select to initialize your repository with a README file should you like. In the event you’re planning to attach an present repository that you’ve got domestically to the challenge you’re organising proper now, don’t test this checkbox. You’ll find yourself overwriting the generated README while you push your challenge anyway so there’s no level in creating one now.
The identical applies to the license and the .gitignore file.
For brand new repositories it is smart to test all of the checkboxes and selecting the choices that suit your wants. Nonetheless, should you’re pushing an present challenge you’ll almost certainly have already got taken care of those three recordsdata in your native machine. And should you haven’t you’ll overwrite the generated recordsdata together with your new native repository, deleting something that GitHub generated in your behalf.
Click on “Create repository” when you’ve set the whole lot as much as see your repository in GitHub’s internet interface.
When you’re on this web page, you’ll see one thing like the next image:
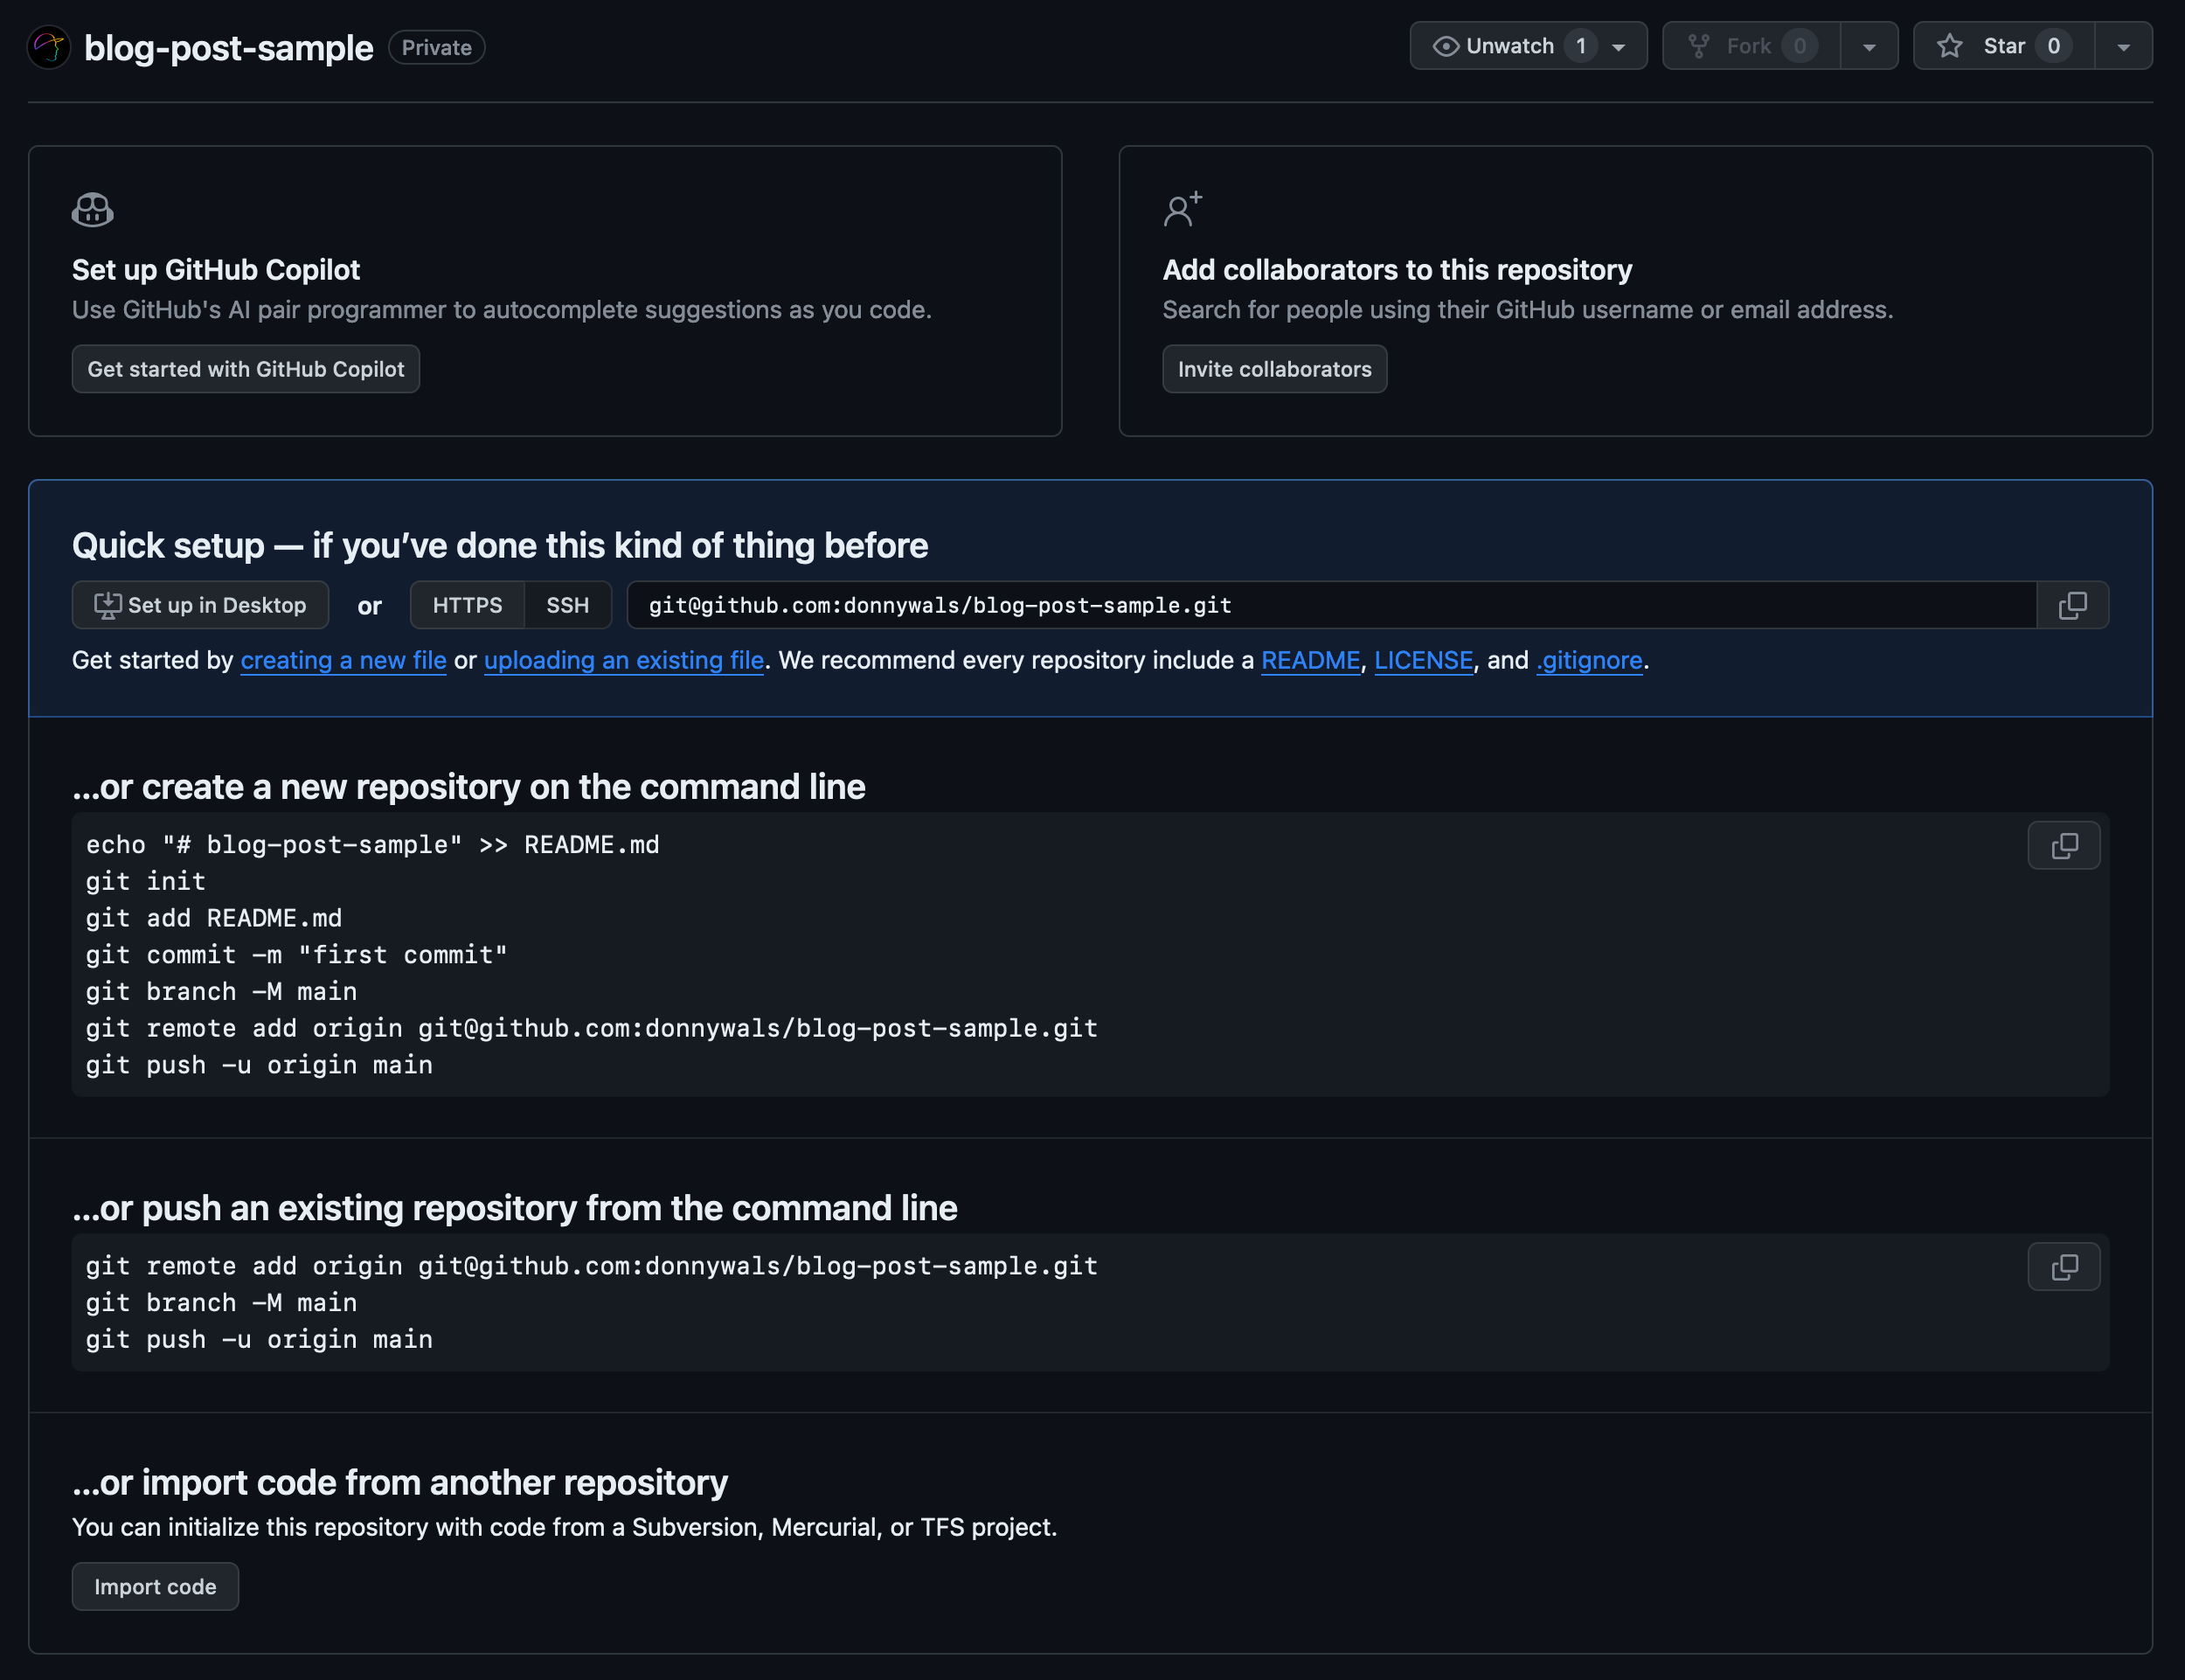
Discover how there are a number of directions which you could observe to both clone your challenge to your laptop, or to attach an present repository to this distant repository.
In the event you’ve made a totally new challenge that you just don’t have a neighborhood repository for but, you may both observe the directions beneath the “create a brand new repository on the command line” header or you may straight clone your repository utilizing the command beneath:
git clone [email protected]:<your repo>You’ll need to exchange <your repo> together with your repository title. For the proper path to your repo, you may copy the [email protected] URL that’s proven beneath the “Fast Setup” header.
When you’ve cloned your repository you can begin including code, making commits, branches, and extra.
The method of making ready an exiting repository to speak to your new distant is a bit of bit extra concerned. The important thing steps are the next three git instructions. All three instructions ought to be run from throughout the git repository that you just need to push to your newly created distant.
git distant add origin <URL>
git department -M principal
git push -u origin principal
The primary command on this sequence provides a brand new distant vacation spot to your git repository. We are able to title our remotes, and on this case the chosen title is origin. You need to use a unique title should you choose, however origin is just about an trade customary so I might advocate to not use a unique title in your distant.
The second command units a department known as principal to be the principle department for this repository. Which means if any person (otherwise you) clones your repository, the default department they’ll take a look at is principal. Once more, you may change this to be any department you’d like however principal is an trade customary at this factors so I like to recommend protecting principal as your default department.
Lastly, a git push is executed. The command pushes the chosen department (principal on this case) to a distant repository. On this case we specify that we need to push our department to the origin that we’ve arrange earlier than. The -u flag that’s handed makes positive that our native principal department is about as much as monitor the distant department origin/principal. Doing this may permit git to test whether or not our distant repository accommodates commits or branches that we don’t have domestically.
Let’s see how we are able to work together with our distant repository via pushing, pulling, and extra.
Interacting with a distant repository
As soon as our native repository is about as much as monitor a distant, we are able to begin interacting with it. The commonest interactions you’ll have with a distant repository are pushing and pulling.
We’ve already checked out pushing code within the earlier part. Once we execute a push command in a neighborhood git repository all commits that belong to the department we’re pushing are uploaded to the native git server.
Often, pushes are pretty trivial. You execute a push, and the code finally ends up in your distant server. Nonetheless, typically you’ll attempt to push however the distant returns an error. For instance, you would possibly run into the next error:
error: did not push some refs to '<YOUR REPO URL>'
trace: Updates have been rejected as a result of the distant accommodates work that you just do
trace: not have domestically. That is often attributable to one other repository pushing
trace: to the identical ref. You might need to first combine the distant adjustments
trace: (e.g., 'git pull ...') earlier than pushing once more.
trace: See the 'Notice about fast-forwards' in 'git push --help' for particulars.
This error tells us what’s fallacious and what we are able to do to resolve the problem. Git is often fairly good at this so it’s essential to rigorously learn errors that git presents to you. Most of the time the error is fairly descriptive however the terminology might sound a bit international to you.
One unconventional tip that I’d like to present right here is which you could as ChatGPT to make clear the problem given to you by git. This typically works properly as a result of how widespread git is amongst totally different builders which implies that an AI like ChatGPT may be very properly skilled to assist perceive issues.
For the error proven above, the same old resolution is to run a git pull earlier than pushing. Once you run git pull, you pull down all of the commits that the distant has in your department. After working your pull, you may strive pushing your department once more. Often this may succeed except a brand new error happens (which I’d say is unusual).
One other command that you should utilize to drag down details about the distant repository is git fetch.
Whereas git pull downloads new commits and applies them to your department, merging in any commits that have been on the distant however not in your native department but, a git fetch solely downloads adjustments.
Which means the brand new commits and branches that existed on the distant can be downloaded into your native repository, however your branches are usually not up to date (but) to reflect the contents from the server.
Utilizing git fetch is helpful if you wish to run git log after fetching to examine what others have labored on with out instantly updating your native branches. It’s additionally helpful if you wish to checklist all branches that at present exist each domestically and remotely with out updating your native branches simply but.
You may checklist all branches that exist domestically and remotely utilizing the git department --all command. The checklist that’s printed by this command accommodates all branches in your repository, permitting you to see if there are any branches on the distant that you just don’t have domestically.
To modify to considered one of these branches, you may write git checkout <branch-name> and git will create a neighborhood department that tracks its distant counter half should you didn’t have a neighborhood copy but. In the event you did use this department in some unspecified time in the future, git will change to the prevailing department as a substitute.
To replace this present model of the department so it’s on the similar commit because the distant you should utilize a daily git pull.
When you’ve made a few commits and also you’re able to push your department to the server you may go forward and use git push -u origin yourbranch to push your new commits as much as the distant, identical to you’ve seen earlier than.
In some unspecified time in the future in time, you would possibly need to delete stale branches that you just not want. Doing this can be a little bit difficult.
Regionally, you may delete a department utilizing git department -d branchname. This received’t delete your department if no different department accommodates the commits from the department you’re about to delete. In different phrases, the -d choice checks whether or not your department is “unmerged” and warns you whether it is.
If you wish to delete your department no matter its merge standing you write git department -D branchname. This can skip the merge checks and delete your department instantly.
Once you need to delete your department in your distant as properly, you must push your delete command. Right here’s what that appears like:
git push origin --delete branchnameOften the online interface in your distant repository may even permit you to delete your branches on the click on of a button.
In Abstract
On this submit, we’ve explored establishing and managing a git repository, with a selected give attention to utilizing GitHub. We started by underscoring the significance of sustaining a neighborhood git repository and the added benefits of internet hosting it on a distant server like GitHub. Having a distant repository not solely makes collaboration simpler but additionally supplies a backup of your work.
We appeared on the steps wanted to create a brand new distant repository on GitHub. You discovered that there are a number of methods to attach a neighborhood repository with a distant, and also you’ve discovered how one can select the choice that most accurately fits you.
Lastly, we explored numerous interactions with a distant repository, together with important duties like pushing and pulling code, and managing native and distant branches. We mentioned methods to handle widespread errors in these processes, highlighting the instructive nature of Git’s error messages. Instructions equivalent to git fetch, git department, and git checkout have been coated, offering insights into their roles in synchronizing and managing branches. The submit wrapped up with steering on deleting branches, detailing the variations between the git department -d and git department -D instructions, and the method for eradicating a department from the distant repository.