
It’s all the time an excellent follow to know the {hardware} elements of your Linux system working, this lets you cope with compatibility points relating to putting in packages, and drivers in your system utilizing yum, dnf, or apt.
On this article, we will take a look at some helpful Linux instructions that may enable you to to extract details about your Linux system and {hardware} elements.
1. The best way to View Linux System Info
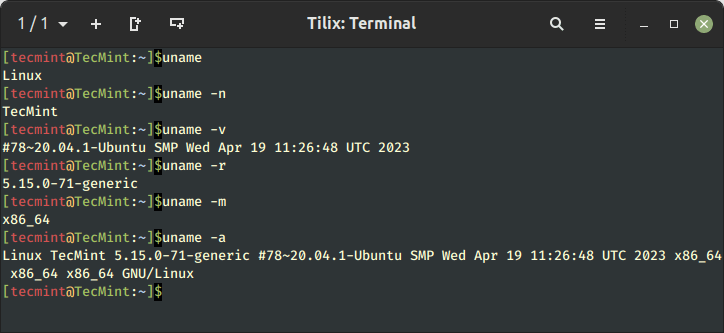
To know solely the system identify, you should utilize the uname command with none change that can print system info or the uname -s command will print the kernel identify of your system.
[email protected] ~ $ uname

Linux
To view your Linux community hostname, use the ‘-n’ change with the uname command as proven.
[email protected] ~ $ uname -n

tecmint.com
To get details about the Linux kernel model, use the ‘-v’ change.
[email protected] ~ $ uname -v

#64-Ubuntu SMP Mon Sep 22 21:28:38 UTC 2014
To get the details about your Linux kernel launch, use the ‘-r’ change.
[email protected] ~ $ uname -r

3.13.0-37-generic
To print your Linux {hardware} structure identify, use the ‘-m’ change:
[email protected] ~ $ uname -m

x86_64
All this info might be printed without delay by working the ‘uname -a’ command as proven under.
[email protected] ~ $ uname -a

Linux tecmint.com 3.13.0-37-generic #64-Ubuntu SMP Mon Sep 22 21:28:38
UTC 2014 x86_64 x86_64 x86_64 GNU/Linux
2. The best way to View Linux System {Hardware} Info
Right here you should utilize the lshw software to assemble huge details about your {hardware} elements equivalent to cpu, disks, reminiscence, usb controllers, and so on.
lshw is a comparatively small software and there are just a few choices that you should utilize with it whereas extracting info. The knowledge supplied by lshw was gathered from totally different /proc recordsdata.
Word: Do keep in mind that the lshw command is executed by the superuser (root) or sudo person.
To print details about your Linux system {hardware}, run the next command.
[email protected] ~ $ sudo lshw

tecmint.com
    description: Pocket book
    product: 20354 (LENOVO_MT_20354_BU_idea_FM_Lenovo Z50-70)
    vendor: LENOVO
    model: Lenovo Z50-70
    serial: 1037407803441
    width: 64 bits
    capabilities: smbios-2.7 dmi-2.7 vsyscall32
    configuration: administrator_password=disabled boot=regular
    chassis=pocket book household=IDEAPAD frontpanel_password=disabled
    keyboard_password=disabled power-on_password=disabled
    sku=LENOVO_MT_20354_BU_idea_FM_Lenovo Z50-70
    uuid=E4B1D229-D237-E411-9F6E-28D244EBBD98
  *-core
       description: Motherboard
       product: Lancer 5A5
       vendor: LENOVO
       bodily id: 0
       model: 31900059WIN
       serial: YB06377069
       slot: Type2 - Board Chassis Location
     *-firmware
          description: BIOS
          vendor: LENOVO
          bodily id: 0
          model: 9BCN26WW
          date: 07/31/2014
          measurement: 128KiB
          capability: 4032KiB
          capabilities: pci improve shadowing cdboot bootselect edd
          int13floppytoshiba int13floppy360 int13floppy1200 int13floppy720
int13floppy2880 int9keyboard int10video acpi usb biosbootspecification uefi
......
You possibly can print a abstract of your {hardware} info through the use of the -short choice.
[email protected] ~ $ sudo lshw -short

H/W path       System      Class          Description
=====================================================
                           system         20354 (LENOVO_MT_20354_
                                          BU_idea_FM_Lenovo Z50-70)
/0                         bus            Lancer 5A5
/0/0                       reminiscence         128KiB BIOS
/0/4                       processor      Intel(R) Core(TM) i5-4210U
                                          CPU @ 1.70GHz
/0/4/b                     reminiscence         32KiB L1 cache
/0/4/c                     reminiscence         256KiB L2 cache
/0/4/d                     reminiscence         3MiB L3 cache
/0/a                       reminiscence         32KiB L1 cache
/0/12                      reminiscence         8GiB System Reminiscence
/0/12/0                    reminiscence         DIMM [empty]
/0/12/1                    reminiscence         DIMM [empty]
/0/12/2                    reminiscence         8GiB SODIMM DDR3 Synchronous
                                          1600 MHz (0.6 ns)
/0/12/3                    reminiscence         DIMM [empty]
/0/100                     bridge         Haswell-ULT DRAM Controller
/0/100/2                   show        Haswell-ULT Built-in
                                          Graphics Controller
/0/100/3                   multimedia     Haswell-ULT HD Audio Controller
...
In the event you want to generate output as an html file, you should utilize the choice -html.
[email protected] ~ $ sudo lshw -html > lshw.html

3. The best way to View Linux CPU Info
To view details about your CPU, use the lscpu command because it reveals details about your CPU structure such because the variety of CPUs, cores, CPU household mannequin, CPU caches, threads, and so on from sysfs and /proc/cpuinfo.
[email protected] ~ $ lscpu

Structure:          x86_64
CPU op-mode(s):        32-bit, 64-bit
Byte Order:            Little Endian
CPU(s):                4
On-line CPU(s) record:   0-3
Thread(s) per core:    2
Core(s) per socket:    2
Socket(s):             1
NUMA node(s):          1
Vendor ID:             GenuineIntel
CPU household:            6
Mannequin:                 69
Stepping:              1
CPU MHz:               768.000
BogoMIPS:              4788.72
Virtualization:        VT-x
L1d cache:             32K
L1i cache:             32K
L2 cache:              256K
L3 cache:              3072K
NUMA node0 CPU(s):     0-3
4. The best way to Gather Linux Block System Info
Block units are storage units equivalent to exhausting disks, flash drives, and so on. lsblk command is used to report details about block units as follows.
[email protected] ~ $ lsblk

NAME    MAJ:MIN RM   SIZE RO TYPE MOUNTPOINT
sda       8:0    0 931.5G  0 disk
├─sda1    8:1    0  1000M  0 half
├─sda2    8:2    0   260M  0 half /boot/efi
├─sda3    8:3    0  1000M  0 half
├─sda4    8:4    0   128M  0 half
├─sda5    8:5    0 557.1G  0 half
├─sda6    8:6    0    25G  0 half
├─sda7    8:7    0  14.7G  0 half
├─sda8    8:8    0     1M  0 half
├─sda9    8:9    0 324.5G  0 half /
└─sda10   8:10   0   7.9G  0 half [SWAP]
sr0      11:0    1  1024M  0 rom
If you wish to view all block units in your system then embrace the -a choice.
[email protected] ~ $ lsblk -a

NAME    MAJ:MIN RM   SIZE RO TYPE MOUNTPOINT
sda       8:0    0 931.5G  0 disk
├─sda1    8:1    0  1000M  0 half
├─sda2    8:2    0   260M  0 half /boot/efi
├─sda3    8:3    0  1000M  0 half
├─sda4    8:4    0   128M  0 half
├─sda5    8:5    0 557.1G  0 half
├─sda6    8:6    0    25G  0 half
├─sda7    8:7    0  14.7G  0 half
├─sda8    8:8    0     1M  0 half
├─sda9    8:9    0 324.5G  0 half /
└─sda10   8:10   0   7.9G  0 half [SWAP]
sdb       8:16   1         0 disk
sr0      11:0    1  1024M  0 rom
ram0      1:0    0    64M  0 disk
ram1      1:1    0    64M  0 disk
ram2      1:2    0    64M  0 disk
ram3      1:3    0    64M  0 disk
ram4      1:4    0    64M  0 disk
ram5      1:5    0    64M  0 disk
ram6      1:6    0    64M  0 disk
ram7      1:7    0    64M  0 disk
ram8      1:8    0    64M  0 disk
ram9      1:9    0    64M  0 disk
loop0     7:0    0         0 loop
loop1     7:1    0         0 loop
loop2     7:2    0         0 loop
loop3     7:3    0         0 loop
loop4     7:4    0         0 loop
loop5     7:5    0         0 loop
loop6     7:6    0         0 loop
loop7     7:7    0         0 loop
ram10     1:10   0    64M  0 disk
ram11     1:11   0    64M  0 disk
ram12     1:12   0    64M  0 disk
ram13     1:13   0    64M  0 disk
ram14     1:14   0    64M  0 disk
ram15     1:15   0    64M  0 disk
5. The best way to Test USB Controller in Linux
The lsusb command is used to report details about USB controllers and all of the units which might be linked to them.
[email protected] ~ $ lsusb

Bus 001 System 002: ID 8087:8000 Intel Corp.
Bus 001 System 001: ID 1d6b:0002 Linux Basis 2.0 root hub
Bus 003 System 001: ID 1d6b:0003 Linux Basis 3.0 root hub
Bus 002 System 005: ID 0bda:b728 Realtek Semiconductor Corp.
Bus 002 System 004: ID 5986:0249 Acer, Inc
Bus 002 System 003: ID 0bda:0129 Realtek Semiconductor Corp.
RTS5129 Card Reader Controller
Bus 002 System 002: ID 045e:00cb Microsoft Corp.
Primary Optical Mouse v2.0
Bus 002 System 001: ID 1d6b:0002 Linux Basis
2.0 root hub
You should use the -v choice to generate detailed details about every USB system.
[email protected] ~ $ lsusb -v
6. The best way to Test PCI Units in Linux
PCI units might embrace usb ports, graphics playing cards, community adapters, and so on. The lspci software is used to generate info regarding all PCI controllers in your system plus the units which might be linked to them.
To print details about PCI units run the next command.
[email protected] ~ $ lspci

00:00.0 Host bridge: Intel Company Haswell-ULT
DRAM Controller (rev 0b)
00:02.0 VGA suitable controller: Intel Company Haswell-ULT
Built-in Graphics Controller (rev 0b)
00:03.0 Audio system: Intel Company Haswell-ULT HD Audio Controller
(rev 0b)
00:14.0 USB controller: Intel Company Lynx Level-LP USB xHCI HC
(rev 04)
00:16.0 Communication controller: Intel Company Lynx Level-LP HECI #0
(rev 04)
00:1b.0 Audio system: Intel Company Lynx Level-LP HD Audio Controller
(rev 04)
00:1c.0 PCI bridge: Intel Company Lynx Level-LP PCI Specific Root Port 3
(rev e4)
00:1c.3 PCI bridge: Intel Company Lynx Level-LP PCI Specific Root Port 4
(rev e4)
00:1c.4 PCI bridge: Intel Company Lynx Level-LP PCI Specific Root Port 5
(rev e4)
00:1d.0 USB controller: Intel Company Lynx Level-LP USB EHCI #1
(rev 04)
00:1f.0 ISA bridge: Intel Company Lynx Level-LP LPC Controller
(rev 04)
00:1f.2 SATA controller: Intel Company Lynx Level-LP SATA Controller 1
[AHCI mode] (rev 04)
00:1f.3 SMBus: Intel Company Lynx Level-LP SMBus Controller (rev 04)
01:00.0 Ethernet controller: Realtek Semiconductor Co., Ltd. RTL8111/8168/8411
PCI Specific Gigabit Ethernet Controller (rev 10)
02:00.0 Community controller: Realtek Semiconductor Co., Ltd.
RTL8723BE PCIe Wi-fi Community Adapter
03:00.0 3D controller: NVIDIA Company GM108M [GeForce 840M] (rev a2)
Use the -t choice to provide output in a tree format.
[email protected] ~ $ lspci -t

-[0000:00]-+-00.0
           +-02.0
           +-03.0
           +-14.0
           +-16.0
           +-1b.0
           +-1c.0-[01]----00.0
           +-1c.3-[02]----00.0
           +-1c.4-[03]----00.0
           +-1d.0
           +-1f.0
           +-1f.2
           -1f.3
Use the -v choice to provide detailed details about every linked system.
[email protected] ~ $ lspci -v

00:00.0 Host bridge: Intel Company Haswell-ULT DRAM Controller (rev 0b)
	Subsystem: Lenovo System 3978
	Flags: bus grasp, quick devsel, latency 0
	Capabilities:

00:02.0 VGA suitable controller: Intel Company Haswell-ULT
Built-in Graphics Controller (rev 0b) (prog-if 00 [VGA controller])
	Subsystem: Lenovo System 380d
	Flags: bus grasp, quick devsel, latency 0, IRQ 62
	Reminiscence at c3000000 (64-bit, non-prefetchable) [size=4M]
	Reminiscence at d0000000 (64-bit, prefetchable) [size=256M]
	I/O ports at 6000 [size=64]
	Growth ROM at  [disabled]
	Capabilities:
	Kernel driver in use: i915
.....
7. The best way to Test SCSI Units in Linux
To view all of your scsi/sata units, use the lsscsi command as follows. In the event you would not have the lsscsi software put in, run the next command to put in it.
$ sudo apt-get set up lsscsi        [on Debian derivatives]
# yum set up lsscsi                 [On RedHat based systems]
# dnf set up lsscsi                 [On Fedora 21+ Onwards]
After set up, run the lsscsi command as proven:
[email protected] ~ $ lsscsi

[0:0:0:0]    disk    ATA      ST1000LM024 HN-M 2BA3  /dev/sda
[1:0:0:0]    cd/dvd  PLDS     DVD-RW DA8A5SH   RL61  /dev/sr0
[4:0:0:0]    disk    Generic- xD/SD/M.S.       1.00  /dev/sdb
Use the -s choice to indicate system sizes.
[email protected] ~ $ lsscsi -s

[0:0:0:0]    disk    ATA      ST1000LM024 HN-M 2BA3  /dev/sda   1.00TB
[1:0:0:0]    cd/dvd  PLDS     DVD-RW DA8A5SH   RL61  /dev/sr0        -
[4:0:0:0]    disk    Generic- xD/SD/M.S.       1.00  /dev/sdb        -
8. The best way to Test SATA System in Linux
You could find some details about sata units in your system as follows utilizing the hdparm utility. Within the instance under, I used the block system /dev/sda1 which is the exhausting disk on my system.
[email protected] ~ $ sudo hdparm /dev/sda1

/dev/sda1:
 multcount     =  0 (off)
 IO_support    =  1 (32-bit)
 readonly      =  0 (off)
 readahead     = 256 (on)
 geometry      = 56065/255/63, sectors = 2048000, begin = 2048
To print details about system geometry when it comes to cylinders, heads, sectors, measurement, and the beginning offset of the system, use the -g choice.
[email protected] ~ $ sudo hdparm -g /dev/sda1

/dev/sda1:
 geometry      = 56065/255/63, sectors = 2048000, begin = 2048
9. The best way to Test Linux File System Info
To collect details about file system partitions, you should utilize the fdisk command. Though the primary performance of the fdisk command is to modify file system partitions, it can be used to view details about the totally different partitions in your file system.
You possibly can print partition info as follows. Bear in mind to run the command as a superuser or else chances are you’ll not see any output.
[email protected] ~ $ sudo fdisk -l

WARNING: GPT (GUID Partition Desk) detected on '/dev/sda'!
The util fdisk does not help GPT. Use GNU Parted.


Disk /dev/sda: 1000.2 GB, 1000204886016 bytes
255 heads, 63 sectors/monitor, 121601 cylinders,
complete 1953525168 sectors
Items = sectors of 1 * 512 = 512 bytes
Sector measurement (logical/bodily): 512 bytes / 4096 bytes
I/O measurement (minimal/optimum): 4096 bytes / 4096 bytes
Disk identifier: 0xcee8ad92

   System Boot      Begin         Finish      Blocks   Id  System
/dev/sda1               1  1953525167   976762583+  ee  GPT
Partition 1 doesn't begin on bodily sector boundary.
10. The best way to Test Linux {Hardware} Elements Information
You too can use the dmidecode utility to extract {hardware} info by studying information from the DMI tables.
To print details about Linux reminiscence, run this command as a superuser.
[email protected] ~ $ sudo dmidecode -t reminiscence

# dmidecode 2.12
# SMBIOS entry level at 0xaaebef98
SMBIOS 2.7 current.

Deal with 0x0005, DMI kind 5, 24 bytes
Reminiscence Controller Info
	Error Detecting Technique: None
	Error Correcting Capabilities:
		None
	Supported Interleave: One-way Interleave
	Present Interleave: One-way Interleave
	Most Reminiscence Module Dimension: 8192 MB
	Most Complete Reminiscence Dimension: 32768 MB
	Supported Speeds:
		Different
	Supported Reminiscence Sorts:
		Different
	Reminiscence Module Voltage: Unknown
	Related Reminiscence Slots: 4
		0x0006
		0x0007
		0x0008
		0x0009
	Enabled Error Correcting Capabilities:
		None
...
To print details about the system, run this command.
[email protected] ~ $ sudo dmidecode -t system

# dmidecode 2.12
# SMBIOS entry level at 0xaaebef98
SMBIOS 2.7 current.

Deal with 0x0001, DMI kind 1, 27 bytes
System Info
	Producer: LENOVO
	Product Title: 20354
	Model: Lenovo Z50-70
	Serial Quantity: 1037407803441
	UUID: 29D2B1E4-37D2-11E4-9F6E-28D244EBBD98
	Wake-up Kind: Energy Change
	SKU Quantity: LENOVO_MT_20354_BU_idea_FM_Lenovo Z50-70
	Household: IDEAPAD
...
To print details about Linux BIOS, run this command.
[email protected] ~ $ sudo dmidecode -t bios

# dmidecode 2.12
# SMBIOS entry level at 0xaaebef98
SMBIOS 2.7 current.

Deal with 0x0000, DMI kind 0, 24 bytes
BIOS Info
	Vendor: LENOVO
	Model: 9BCN26WW
	Launch Date: 07/31/2014
	Tackle: 0xE0000
	Runtime Dimension: 128 kB
	ROM Dimension: 4096 kB
	Traits:
		PCI is supported
		BIOS is upgradeable
		BIOS shadowing is allowed
		Boot from CD is supported
		Selectable boot is supported
		EDD is supported
		Japanese floppy for NEC 9800 1.2 MB is supported (int 13h)
		Japanese floppy for Toshiba 1.2 MB is supported (int 13h)
		5.25"/360 kB floppy providers are supported (int 13h)
		5.25"/1.2 MB floppy providers are supported (int 13h)
		3.5"/720 kB floppy providers are supported (int 13h)
		3.5"/2.88 MB floppy providers are supported (int 13h)
		8042 keyboard providers are supported (int 9h)
		CGA/mono video providers are supported (int 10h)
		ACPI is supported
		USB legacy is supported
		BIOS boot specification is supported
		Focused content material distribution is supported
		UEFI is supported
	BIOS Revision: 0.26
	Firmware Revision: 0.26
...
To print details about the Linux processor, run this command.
[email protected] ~ $ sudo dmidecode -t processor

# dmidecode 2.12
# SMBIOS entry level at 0xaaebef98
SMBIOS 2.7 current.

Deal with 0x0004, DMI kind 4, 42 bytes
Processor Info
	Socket Designation: U3E1
	Kind: Central Processor
	Household: Core i5
	Producer: Intel(R) Company
	ID: 51 06 04 00 FF FB EB BF
	Signature: Kind 0, Household 6, Mannequin 69, Stepping 1
	Flags:
...
Abstract
There are a lot of different methods you should utilize to acquire details about your Linux system {hardware} elements. Most of those instructions use recordsdata within the /proc listing to extract system info.
Hope you discover the following tips and tips helpful and bear in mind to publish a remark in case you wish to add extra info to this or should you face any difficulties in utilizing any of the instructions. Bear in mind to all the time keep linked to Tecmint.